
Quick Fix: Fill Cracks in Your Wood Craft
• What: Repair cracks in wood projects
• Time: 20 min
• Skill: Beginner
• Tools & Materials: Wood filler, putty knife, sandpaper, clean cloth
• Cost: $5–$15
• Safety: Wear gloves and work in a well-ventilated area
Have you ever seen a crack on a wood piece you love and thought it was ruined? In reality, that crack is a chance to bring new life to your project. This simple guide shows you how to fill in cracks using everyday tools. Whether it’s a family heirloom or the latest DIY project, you can fix it at home and enjoy the change. Let’s get to work and make your craft last.
Step-by-Step Guide: How to Fill Cracks in Wood Crafts
Quick Fix:
• What: Fill cracks in wood crafts
• Time: 30–60 min (plus curing time)
• Skill: Beginner to Intermediate
• Tools & Materials: Stiff brush or compressed air, respirator mask, small cleaning tool, painter’s tape, epoxy resin and hardener (mixed 1:1), optional tint, spatula, propane torch, scraper
• Cost: Parts $10–$20
• Safety: Wear a mask, work in a well-ventilated area, and use the torch carefully
-
Clean the wood. Brush off dust and bits with a stiff brush or use compressed air. Wear your mask to keep dust away from the epoxy.
-
Check the crack. Remove any loose bits with a small tool. This makes sure the epoxy fills the gap evenly.
-
Tape the edges. Stick painter’s tape along both sides of the crack. This keeps the epoxy from leaking and makes the repair edges neat.
-
Mix the epoxy. Combine the resin and hardener in a 1:1 mix. If you want a colored touch, add a little tint. Stir slowly to avoid extra air bubbles.
-
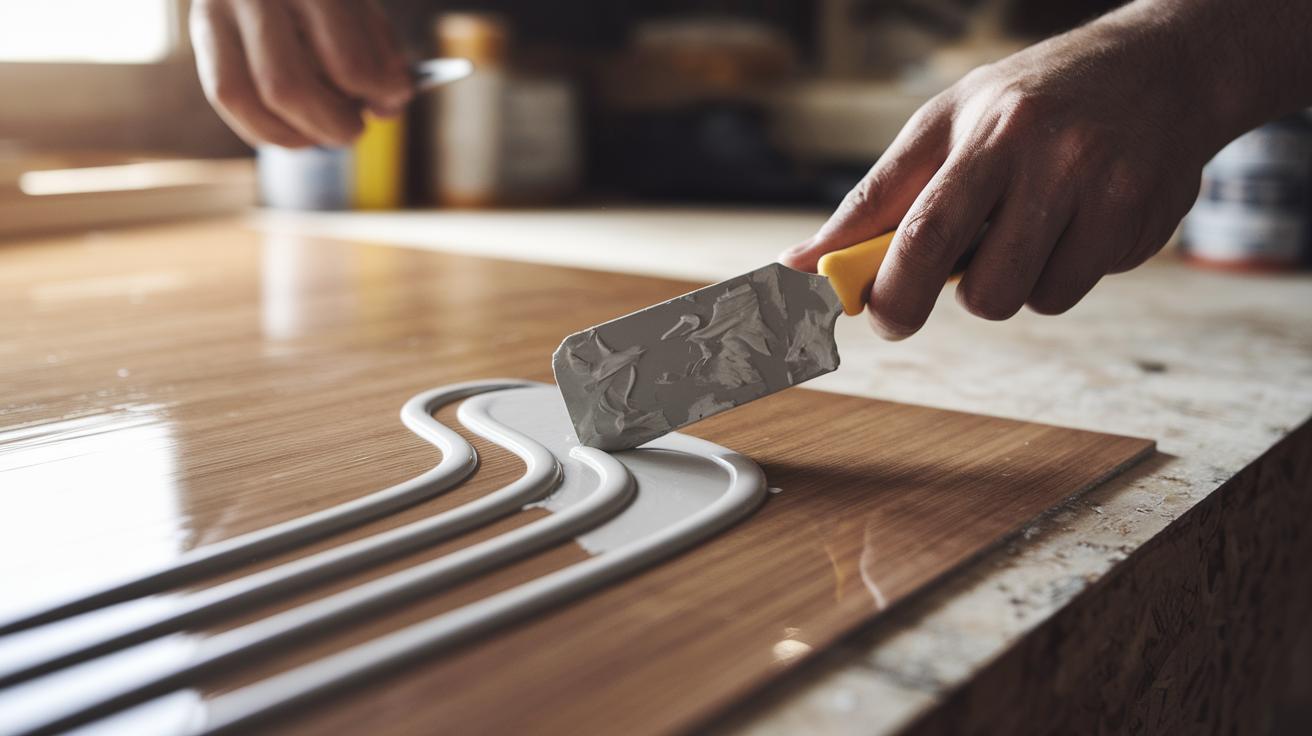
Fill in layers. Use a spatula to push the epoxy into the crack in 1/4-in layers (about 6 mm). Press it deep so each layer can set well.
-
Remove bubbles. Run a propane torch lightly over the fresh epoxy layer. This burns off air bubbles and smooths the surface. Move steadily to avoid overheating.
-
Let it cure. Allow the epoxy to harden completely, which may take several days. Then peel off the tape and scrape away any extra epoxy for a smooth finish. Quality epoxy will stick through wood expansion and contraction for at least seven years.
Preparing Wood Crafts for Crack Filling

Quick Fix:
What: Ready your wood craft for crack filling.
Time: 15 min
Skill: Beginner
Tools & Materials: Respirator mask, stiff brush or compressed air, painter’s tape or acetate, spatula/putty knife, small heat gun or propane torch, epoxy resin and hardener.
Cost: Parts $3–$10
Safety: Wear your respirator mask and work in a well-ventilated area.
Steps:
- Let the wood dry completely. Remove all finishes so the filler sticks well.
- Brush off dust, fibers, and loose bits with a stiff brush or blow them away with compressed air.
- Check that the surface is completely clean and free of any residual debris.
- Protect your lungs, put on your respirator mask.
- Tape the edges around the crack. This helps keep the filler where it belongs.
- You’re now set for a smooth, lasting repair.
Tools you need:
| Tool/Material | Description |
|---|---|
| Respirator Mask | Guards against dust and fumes |
| Stiff Brush or Compressed Air | Clears dust and loose particles |
| Painter’s Tape or Acetate | Keeps the filler confined to the repair area |
| Spatula/Putty Knife | Spreads the filler smoothly |
| Propane Torch or Small Heat Gun | Aids in curing the filler if needed |
| Epoxy Resin & Hardener | Fills and seals the wood crack |
Each step matters to ensure a neat repair that lasts. Follow these clear instructions and work safely to get the best results.
Choosing the Right Filler for Wood Crafts Crack Repair
Quick Fix:
• What: Seal cracks in wood crafts
• Time: 20 min
• Skill: Beginner – basic hand skills and care needed
• Tools & Materials: Your choice of epoxy resin, water/solvent-based filler, polymer filler, or tinted epoxy
• Cost: Approximately $3–$15
• Safety: Work in a well-ventilated area and follow product directions
- Check your crack. Look at its width and how much the wood moves.
- If the crack might grow or face harsh weather, use epoxy resin. It bonds strong and lasts through seasonal changes.
- For small, non-structural cracks where you need a fast fix, water- or solvent-based fillers work well. They are easier to sand but not as tough.
- When you need flexibility, choose polymer filler. It moves with the wood so it won’t crack again.
- To add a decorative twist, mix in some crushed minerals with tinted epoxy. This turns a repair into a design feature.
| Filler Type | Best Use |
|---|---|
| Epoxy Resin | High-stress repairs and cracks that may widen |
| Water/Solvent-Based | Minor cracks, quick fixes |
| Polymer Filler | Cracks needing flexibility along with strength |
| Tinted Epoxy | Repairs with a decorative touch |
Techniques for Applying Wood Filler in Crafts
Layered Epoxy Pour
Apply epoxy in 1/4-in (6 mm) thick layers to fill deep cracks. Use a spatula to push the filler into every corner of the crack. After each layer, pass a propane torch lightly over the surface to pop air bubbles and help the epoxy stick. This thin layering stops the filler from overheating while it cures and keeps the repair strong.
Putty Knife or Spatula Spread
For fine or shallow cracks, load the filler on a putty knife. Press the filler firmly into the crack, then smooth it out until it is even with the surrounding wood. This method is great for quick, neat fixes that blend right in with the rest of the piece.
Caulking Gun Dispense
When you have long or wide cracks, use a caulking gun with a cartridge-style epoxy or wood filler. Squeeze the filler steadily along the crack to avoid empty spots. Right after application, smooth the filler with a damp finger or tool for a clean finish.
Decorative Pigmented Inlay
Mix epoxy with dye or crushed minerals to add a decorative touch before application. Press this tinted filler into the crack and let it cure completely. Once dry, sand it smooth to reveal a repair that also highlights the natural wood grain.
Sanding and Finishing Filled Cracks in Wood Crafts
Quick Fix:
• What: Smooth out and finish filled wood cracks.
• Time: 30–45 min.
• Skill: Beginner.
• Tools & Materials: Scraper, 220–320 grit sandpaper, a scrap piece of wood for testing, matching stain or craft paint, and a protective varnish or clear finish.
• Cost: Approximately $10–$20.
• Safety: Work in a well-ventilated area and wear a dust mask.
- Let the filler cure completely. Then use a scraper to remove any extra buildup so the repair is level with the rest of your craft.
- Smooth the surface with 220–320 grit sandpaper. Sand evenly to blend the repair into the surrounding wood and avoid any hard edges.
- Test your stain or craft paint on a spare piece of wood. This will help you check the color match and see how the finish looks.
- Once the test looks good, apply the stain or paint to the repaired area. Let it dry fully before you add another coat.
- As a final step, spread a coat of varnish or clear finish over the entire surface. This seals the repair and protects your craft from moisture and everyday wear.
| Essential Supplies | Details |
|---|---|
| Sandpaper | 220–320 grit |
| Stain or Craft Paint | Color matching your project |
| Protective Finish | Varnish or clear finish |
| Tool | Scraper |
Troubleshooting Common Wood Crafts Crack Filling Issues

Quick Fix:
• What: Ensure your wood filler cures evenly.
• Time: 10–15 min review.
• Skill: Beginner to intermediate.
• Tools & Materials: Clean tool for testing, dehumidifier or improved ventilation.
• Cost: Low.
• Safety: Work in a clean, dust-free area.
When you fill cracks in wood crafts, watch out for factors that slow curing or weaken bonds. For instance, if your epoxy (a strong bonding glue) stays sticky longer than expected, check that your workspace is between 65–80°F (18–26°C) and has good airflow. Lightly press the epoxy; if it remains tacky after the usual cure time, try lowering humidity or using a dehumidifier.
If you find uneven curing or sticky patches, do a small test with a clean tool to see if the filler has set. You might need to adjust your mix. For example, when using a pigmented filler, ensure the tint mix isn’t delaying the cure. Testing on a small scrap piece first can save you issues later.
Sometimes, dust or other contaminants can mess with adhesion. Even if you’re using thin 1/4-in (6 mm) layers and a torch to pop bubbles, a clean wood surface is key for a lasting fix.
Key Troubleshooting Tips:
- Keep your workspace at 65–80°F (18–26°C).
- Check small areas to confirm the filler has cured evenly.
- Always prep a clean, dust-free wood surface before filling.
Safety and Maintenance Tips for Wood Crafts Crack Filling
Quick Fix:
- What: Safely fill wood cracks and keep your craft looking fresh.
- Time: 15 min setup and regular check-ups.
- Skill: Beginner-friendly.
- Tools & Materials: Respirator, gloves (use nitrile for uncured fillers), eye protection, epoxy resin filler, mild detergent.
- Cost: Low.
- Safety: Work in a well-ventilated area and wear your safety gear.
- Wear your safety gear. Put on a respirator, gloves, and eye protection to guard against dust, fumes, and splashes. Use nitrile gloves when handling uncured fillers for extra protection.
- Work in a space with good airflow. Fresh air helps clear away any harmful fumes.
- Set your workshop temperature between 65°F and 75°F (18–24°C). This range helps the epoxy cure evenly and prevents early shrinkage or distortion.
- Control the humidity. Keeping steady humidity can stop the wood from cracking again.
- Check your repairs regularly. A quick look over can catch small cracks or residue buildup before they become bigger issues.
- Keep it clean. Use a mild detergent to wash away grease and dirt while keeping your wood craft in top shape.
Key Tips:
- Always wear a respirator, gloves, and eye protection.
- Maintain the proper temperature and ventilation.
- Inspect your work often and clean gently for lasting results.
Final Words
In the action, you learned to prepare wood crafts by cleaning and masking the area, choose the right filler, apply it in manageable layers, and finish with sanding and protective overlays. Each step helps you tackle wood repair with simple techniques and the correct tools while keeping safety in check.
Taking a careful approach means your projects remain durable and attractive. Remember, following these tips is the key to mastering how to fill cracks in wood crafts and achieving strong, lasting fixes.
FAQ
How to fill cracks in wood crafts without glue
Filling cracks in wood crafts without glue involves using a filler like epoxy or wood filler. Clean the crack, apply the filler with a spatula, let it cure, and then sand until smooth for a solid repair.
How to fill cracks in wood with epoxy
Filling cracks with epoxy requires mixing resin and hardener at a 1:1 ratio. Apply in thin 1/4‑in layers with a spatula, use a torch to remove air bubbles, let fully cure, and sand off any excess.
Wood crack Repair Kit
A wood crack repair kit bundles essential tools and materials such as epoxy resin and hardener, a spatula, painter’s tape, a respirator, and a propane torch. This kit covers every step from cleaning to finishing cracks.
Best way to fill in cracks in wood
The best way to fill wood cracks is to clean and dry the area, apply a suitable filler (like epoxy) in layers, remove bubbles with a heat source, let it cure, and sand flush for a smooth finish.
How to use wood filler on large holes
To use wood filler on large holes, secure the area with painter’s tape, fill in successive thin layers of epoxy or wood filler, allow each to cure completely, and then sand smooth to restore the wood’s surface.
How to fill hairline cracks in wood
Filling hairline cracks in wood involves gently applying a thin layer of wood filler with a putty knife, smoothing it over the crack, allowing it to cure, and then lightly sanding for an almost invisible repair.
How to fix cracked wood furniture
Fixing cracked wood furniture starts with cleaning the crack and mixing an epoxy resin and hardener. Apply it carefully with a spatula, let it fully cure, and finish with sanding and refinishing to blend the repair.
What epoxy to use to fill cracks in wood
The epoxy to use should be a high-quality resin that offers strong adhesion and durability, typically mixed at a 1:1 ratio. Such epoxy provides a long-lasting bond and withstands expansion and contraction in wood.
How to fix cracks in wood carvings
Cracks in wood carvings are fixed by cleaning the area, applying a fine epoxy mixture directly into the cracks, using a heat tool to remove bubbles, curing fully, and then gently sanding for a smooth finish.
What is best to fill in cracks in wood
The best filler for wood cracks is a robust epoxy that bonds well, cures to a durable finish, and can be tinted for a seamless look. Ensure the wood is clean and dry before applying for optimal results.
How to fill gaps in woodworking projects
Filling gaps in woodworking projects involves cleaning the gap, applying a matching epoxy or wood filler with a putty knife, smoothing the material, and waiting for a full cure before sanding for an even surface.
How to fill a crack in wood and make it invisible
Making a crack invisible starts with cleaning the defect, filling it with a tinted epoxy applied in layers, removing air bubbles with a torch, curing completely, and then sanding the area flush with the rest of the wood.