
Quick Fix:
• What: Create a mini bottle garden
• Time: 20 min
• Skill: Beginner
• Tools & Materials: Clean bottle, pebbles, charcoal (small pieces), potting soil, and a small plant
• Cost: Around $5–$15
• Safety: Use gloves when handling glass
- Clean your bottle well to remove any dirt or residue.
- Pour a layer of pebbles into the bottom (about 1/4 in or 6 mm) so water can drain.
- Add a thin layer of small charcoal pieces to help keep the soil fresh.
- Fill the bottle with potting soil until it is about halfway full.
- Gently place your small plant into the soil and pat it down lightly.
Enjoy your new mini garden that turns an old bottle into a lively decor piece. It’s a fun way to recycle and brighten up your room!
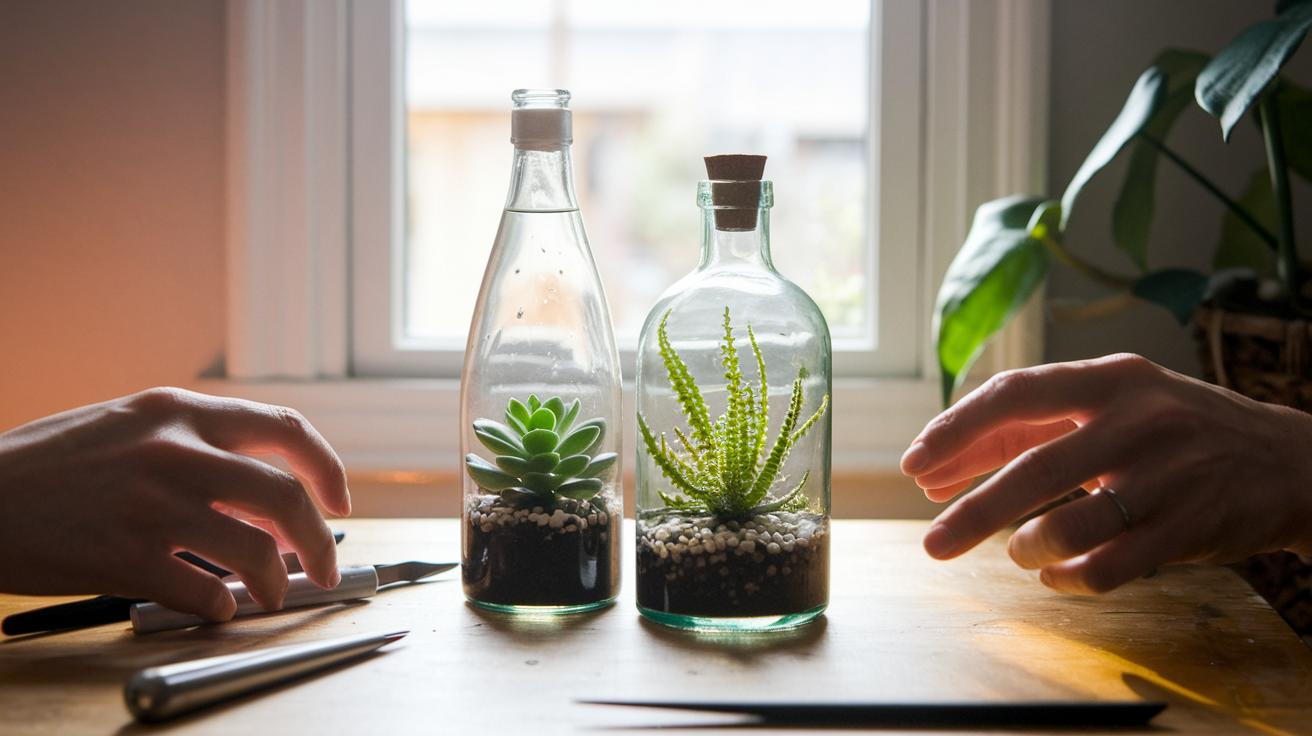
DIY Bottle Terrarium: Charming Mini Garden Magic
Quick Fix:
• What: Turn an old bottle into a mini garden
• Time: 30–60 min
• Skill: Beginner
• Tools & materials: Clean bottle, small pebbles, activated charcoal (a type of filter media), potting soil, small plants
• Cost: $5–$20
• Safety: Handle glass carefully
Steps:
- Choose a clean bottle you like.
- Pour in a 1/4 in (6 mm) layer of small pebbles for drainage.
- Add a thin layer of activated charcoal to keep the soil fresh.
- Fill the bottle with potting soil, leaving enough room for your plants.
- Arrange your plants so a larger one takes center stage and smaller ones fill in around it.
- Decide between an open design (great for fresh air-loving plants) or a sealed setup (perfect for tropical plants that need humidity).
This guide shows you how to repurpose a bottle into a charming mini garden. Follow these clear, step-by-step instructions to create a unique project or a lovely gift that brightens up any room. Enjoy your DIY bottle terrarium!
Materials and Tools for a Bottle Terrarium Build

Quick Fix: Build your mini garden in an old bottle.
• Time: 15–30 min
• Skill: Beginner
• Tools & Materials: gravel or stones, natural rocks or shells (boiled for 5 min and cooled), activated charcoal, nutrient potting mix, decorative moss/driftwood/stones, skewers, pipe cleaners, long-handled tweezers
• Cost: Parts $10–$20
• Safety: Sterilize natural items and keep your work area clean
Gather these supplies before you start. They form the terrarium’s base, keep it clean, and help you arrange your plants just right.
• Grab some small gravel or stones to let water drain away.
• Collect natural rocks or shells and boil them for 5 min (then let them cool) to kill bugs and mold.
• Use activated charcoal to stop odor and mold from forming.
• Pick up nutrient-rich potting mix as the growing base for your plants.
• Add decorative moss, driftwood, or extra stones for a nice look.
• Use slender skewers to help place plants in tight bottle openings.
• Have pipe cleaners on hand for small styling touches.
• Grab long-handled tweezers to carefully position your small plants.
Set up your workspace with these items to keep things simple. Boiling natural finds cleans them and wards off bugs and mold. Each item helps turn an old bottle into a lively mini garden. With the right tools, you can easily adjust plants so every layer looks neat and stays healthy.
Step-by-Step Bottle Terrarium Assembly
Quick Fix:
• What: Create a mini bottle terrarium
• Time: 30 min
• Skill: Beginner
• Tools & Materials: Clean glass bottle with lid, gravel (1/4 in/6 mm), small rocks or mesh (1/8 in/3 mm), activated charcoal (1/8 in/3 mm), nutrient-rich potting mix, small plants, optional decomposers, decorative moss or driftwood, filter water
• Cost: $5–$15
• Safety: Work slowly around glass and handle tools with care
-
Prepare Your Container
Pick a clean glass bottle or jar with a lid. Rinse it well to remove dust and any leftover particles. A wide mouth works best for adding layers. -
Add the Drainage Layer
Pour about 1/4 in (6 mm) of gravel or small stones into the bottom. Use a small scoop to spread it out evenly. This layer helps water flow away from plant roots. -
Lay Down the Separation Layer
Place a thin layer (around 1/8 in or 3 mm) of small rocks or mesh on top of the gravel. This keeps the soil from mixing with the drainage and stops roots from reaching the gravel. -
Spread the Activated Charcoal
Pour a 1/8 in (3 mm) layer of activated charcoal over the separation layer. Use a small cup so it covers the base evenly. This helps filter water and keeps odors in check. -
(Optional) Sprinkle Decomposers
If you like, dust in a pinch of decomposers (like springtails) over the charcoal. A small amount helps manage mold without overpowering the terrarium. -
Add the Potting Mix
Fill about one-third of the bottle with rich potting mix. Press the soil down gently by tapping the container to create a firm base for the plants. -
Insert Your Plants
Using long tweezers or skewers, make holes in the soil for your small plants. Place them about 1 in (25 mm) apart so their leaves don’t touch the glass and have room to grow. -
Finish with Decor, Water, and a Seal
Top the soil with moss, small pieces of driftwood, or decorative stones to add style. Water with filter-purified water until the soil is moist all the way down. Seal the lid tightly and set your terrarium in a spot with medium light away from direct sun. If you plan to open it occasionally, leave a small gap for air to circulate.
Plant Selection and Placement in a Bottle Ecosystem
Quick Fix:
• What: Create a thriving bottle terrarium with well-placed plants
• Time: 10–15 min
• Skill: Beginner
• Tools & materials: Tweezers, small paintbrush, skewers, your chosen plants
• Cost: Budget-friendly
• Safety: Handle plants gently to avoid damage
- Pick the right plants for your terrarium style. For open bottles, choose succulents like Kalanchoe, Sempervivum, Crassula, Echeveria, or Sedum. These like bright, indirect light and a bit of fresh air.
- For a closed bottle setup, go with tropical plants such as ferns, calathea, or peperomia. They do best in a moist, greenhouse-like spot with medium light.
- When you place your plants, leave about 1 in (25 mm) of space between each one. This helps prevent their leaves from touching the glass and stops too much moisture from building up.
- Arrange your tropical plants evenly and make sure their leaves do not rub against the bottle sides. This keeps them from decaying.
- Once every plant is in place, gently sweep away any stray debris with a soft paintbrush.
- Use small tools like tweezers or skewers to adjust your plants precisely for a neat display.
| Plant | Ideal Light | Container Type |
|---|---|---|
| Kalanchoe | Bright, indirect | Open bottle terrarium |
| Echeveria | Bright, indirect | Open bottle terrarium |
| Fern | Medium light | Sealed bottle terrarium |
| Calathea | Medium light | Sealed bottle terrarium |
Styling and Customization of Your Bottle Terrarium
Quick Fix:
• What: Create a unique, eye-catching bottle garden.
• Time: 15 min
• Skill: Beginner
• Tools & Materials: Bottle terrarium, mini pumpkins or movie icons, natural moss, driftwood pieces, small shells, micro figurines, and any decorative extras you like.
• Cost: $5–$20
• Safety: Handle glass carefully
- Pick a theme. Decide if you want a spooky look with mini pumpkins and fake cobwebs, a film-inspired scene, or a clean, Zen garden feel.
- Keep it simple. A minimalist setup with natural textures and a tidy layout delivers a peaceful vibe.
- Mix your accents. Add driftwood for a weathered look, shells for a seaside touch, and micro figurines for fun details.
- Make it yours. Use repurposed items you love. One reader even turned six tequila bottles into a cool mini library display.
Try out different ideas until your bottle terrarium feels just right for you. Enjoy creating your own little world!
Maintenance and Troubleshooting for DIY Bottle Terrariums

Quick Fix:
What: Keep your bottle terrarium healthy.
Time: 5 min daily check.
Skill: Beginner (no special training needed).
Tools & Materials: Small paintbrush, narrow tool, tweezers.
Cost: Free to minimal.
Safety: Handle glass carefully to avoid cuts or spills.
- Check Condensation: Look at your terrarium daily. If you notice extra moisture on the glass, lift the lid for about 5 min to let the excess air out or gently brush the residue off with a small paintbrush.
- Check the Drainage Layer: Make sure the barrier between the soil and drainage stays intact. If roots start touching the drainage, they can cause root rot. Use a narrow tool to clear any clogs in the drainage.
- Inspect Plant Placement: Watch for plant leaves that rub against the glass, which could mean they are too crowded. Use tweezers to carefully adjust their positions.
Regular checks and minor fixes like these help keep your mini ecosystem thriving and prevent common problems such as mold and root rot.
Bottle Terrarium Inspiration and Variations
Quick Fix:
What: Make a mini bottle terrarium that brings nature indoors.
Time: 15 min
Skill: Beginner
Tools & Materials: A clean bottle (wine, glass, plastic, whiskey, mason jar, or soda bottle), small plants, potting soil, a handful of decorative stones, and optionally, protective gloves.
Cost: Parts $3–$15
Safety: Use care with glass, wear gloves to avoid cuts.
Steps:
- Clean your chosen bottle thoroughly.
- Pour in a thin layer of stones for drainage.
- Add soil until the bottle is half full.
- Plant a small green or succulent inside.
- Decorate as you like and display your mini garden.
Try different bottles to see what fits your style. Wine bottles offer a classic look, while clear glass lets you admire the inner design. Glass bottles are heavy, so use them where weight isn’t a worry. Plastic bottles are safe on tabletops and perfect for a mini indoor greenhouse effect. For a unique twist, repurpose a whiskey bottle for a rustic feel, a mason jar for a cozy look, or even a soda bottle for a modern spin. Many thrift stores have affordable options that add a sustainable touch. Mix and match various sizes and shapes to create an eye-catching display that shows off your personality. Experiment and have fun with it!
Final Words
In the action, you turned an ordinary bottle into a unique diy bottle terrarium. The guide walked you through choosing materials, building layers, picking plants, and adding decorative touches to create a mini ecosystem.
Every section gave clear steps that make the project easy to follow. Enjoy your renewed space with this mini garden and keep trying new designs for more creative, hands-on fixes.
FAQ
What are DIY bottle terrarium plants?
DIY bottle terrarium plants mean using small, hardy plants set in repurposed bottles with layers of drainage, charcoal, and potting mix to build a tiny, self-contained garden.
What is a DIY bottle terrarium kit?
A DIY bottle terrarium kit provides a set of pre-selected materials and clear instructions so you can assemble your own mini plant display easily.
How can I make a school project terrarium using a plastic bottle?
A plastic bottle terrarium for a school project is made by cleaning the bottle, adding a drainage layer, charcoal, soil, and small plants to create an educational, living ecosystem.
What are some creative bottle terrarium ideas and can I buy a terrarium bottle garden for sale?
Bottle terrarium ideas include themed mini gardens with moss, driftwood, and decorative stones, and you can also find pre-made terrarium bottle gardens available for sale.
Can I make a terrarium in a bottle and how long will it last?
Making a terrarium in a bottle is simple with the right materials, and with proper care, such terrariums can last for years while needing minimal maintenance.
What plants can live in a bottle terrarium environment?
Plants that thrive in bottle terrariums include small succulents for open setups and moisture-loving tropical plants in sealed systems, as long as drainage is good and sun exposure is controlled.
How do you create a closed ecosystem in a bottle terrarium?
Creating a closed ecosystem means layering drainage materials, activated charcoal, and potting mix, then adding selected plants before sealing the bottle to build a self-sustaining environment.