
Quick Fix:
• What: Choose a soldering iron that makes electronics repairs easy.
• Time: 5 min read
• Skill: Beginner
• Tools: None required
• Safety: Handle hot tools with care
A good soldering iron heats up fast and keeps its temperature steady. This means you can work on tiny circuit boards without stress. Look for one that feels comfortable in your hand so you can work smoothly and accurately every time.
When shopping, check for a tool that heats quickly, holds a steady heat, and fits well in your hand. These features help turn tough repairs into simple fixes. Follow these tips to pick the right soldering iron for steady, reliable work on your electronics repair projects.
Key Buying Factors for a Soldering Iron for Electronics Repair
When you work on fragile electronics like circuit boards, the right soldering iron makes all the difference. A good iron heats up fast, gives you steady heat control, and lasts a long time, making your repair jobs easier and safer.
Here are some key points to consider:
- Power: A higher wattage means it heats up quickly and works more efficiently.
- Temperature Range: Look for an iron with a wide range and features like digital displays or temperature locks. This helps melt solder just right for your parts.
- Tip Options: Choose from different shapes such as conical or chisel tips. The right tip lets you handle everything from tiny pads to larger joints.
- Build Quality: A well-built iron stands up to frequent use without losing performance.
- Ergonomics: A comfortable design reduces hand fatigue, especially on long repair sessions.
- Safety Features: Features like secure grips and heat shields help prevent burns.
- Price: Find a balance between cost and quality so you get a tool that performs well without breaking the bank.
A high-power iron is perfect for urgent repairs because it warms up fast. A wide temperature range lets you adjust the heat safely for sensitive components, while a variety of tip shapes gives you the flexibility to handle different types of soldering jobs. Strong build quality and good ergonomics mean your tool can endure years of use without straining your hands. And when you add in safety features and a fair price, you have a reliable soldering iron you can count on for every fix.
Comparing Top Soldering Iron Models for Electronics Repair
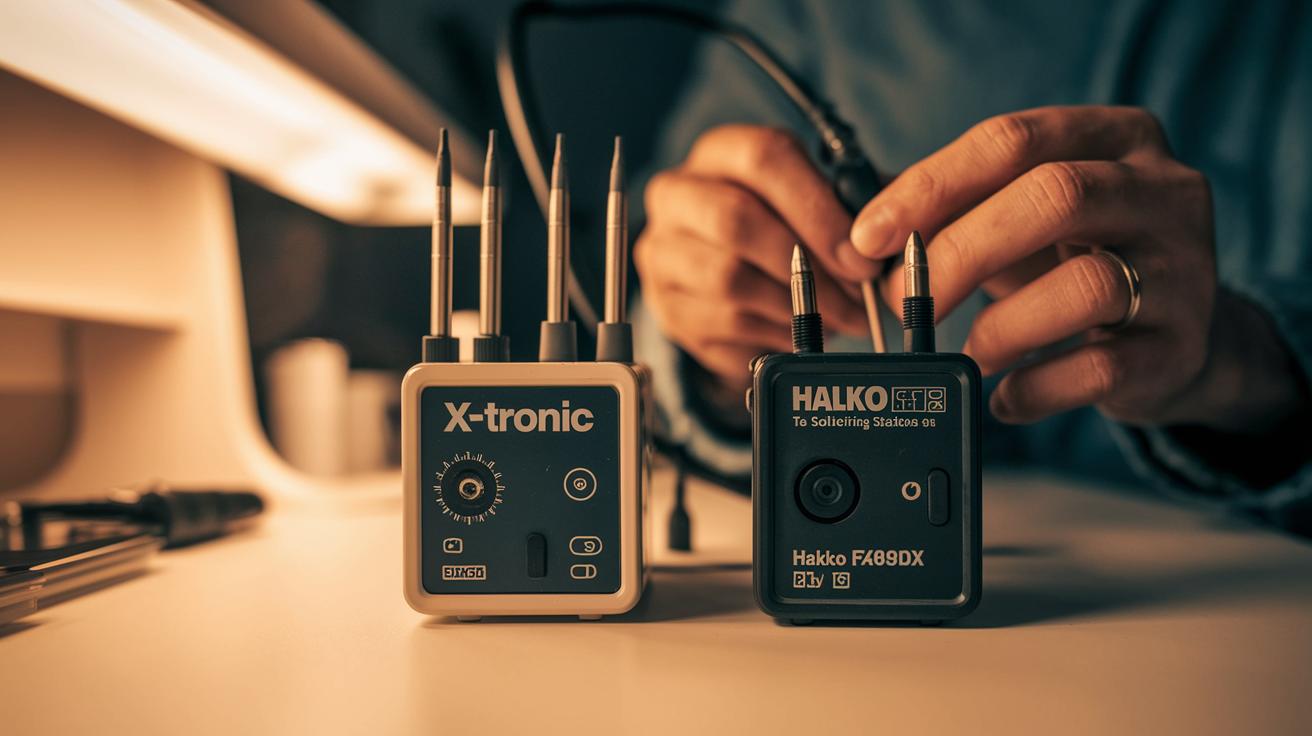
When you work on circuit boards or need precise repair work, a good soldering station makes all the difference. Here, we review four top models that heat up fast, maintain a steady temperature, and feel comfortable even during long repair sessions.
Premium Station Picks
For bench work, the X-Tronic 3020-XTS and the Hakko FX-888DX are solid choices. The X-Tronic warms up quickly, shows a clear digital display, and has a comfortable grip that makes long jobs easier. It delivers performance that rivals more expensive tools while staying affordable. Meanwhile, the Hakko FX-888DX stands out for its tough build and fast temperature recovery, ideal for busy repair shops. It usually comes with a wedge-style tip, though many users swap it out for a conical tip to work on tiny joints with greater precision.
Budget and Portable Options
Hobbyists and field repairers will appreciate the Pinecil V2 and the TS101. The Pinecil V2 powers up in just 10 seconds and runs on USB-C, which makes it very portable and budget-friendly at around $30. Despite its small size, it handles everyday repairs with ease. The TS101 builds on the popular TS100 design by offering more power-supply choices. It works with TS100 tips, giving you advanced control in a mobile package.
| Model | Heat-up Time | Temp Control | Approx. Price |
|---|---|---|---|
| X-Tronic 3020-XTS | Fast (approx. 15-20 s) | Digital, precise | $120-$150 |
| Hakko FX-888DX | Quick (approx. 20-25 s) | Reliable, steady | $200-$220 |
| Pinecil V2 | 10 s | PID controlled | $30 |
| TS101 | Fast (approx. 15 s) | Compatible with TS100 | $70-$90 |
Temperature Control and Tip Technology for PCB Fixes
Quick Fix:
- What: Get strong, neat solder joints by keeping your soldering iron at a steady temperature and using the right tip shape.
- Time: 10 min
- Skill: Intermediate
- Tools & Materials: Digital soldering iron with PID control (such as Pinecil or TS101), analog soldering iron, butane torch (like BERKLING BSG-568), different tip styles (conical, chisel, bevel), damp sponge, fresh solder.
- Cost estimate: Parts around $10–$30
- Safety: Work in a ventilated area and use eye protection.
- Use a digital soldering iron with a PID controller to keep the temperature steady. This helps you get strong, reliable joints without surprises.
- If you use an analog iron, expect some temperature swings. These fluctuations might affect the look and strength of your solder joints.
- For tasks that need fine control, try a butane model like the BERKLING BSG-568. Adjust the flame to around 450 °C (842 °F). But be careful, as these tools need extra attention to keep the heat even.
- Pick your tip wisely. Use a conical tip for tight spots on your circuit board. A chisel tip works best when soldering long traces, and a bevel tip gives you a neat edge for tricky or tight angles.
- Keep your tip in top shape. Wipe it on a damp sponge between joints and tin it with fresh solder right after use. This simple routine helps prevent oxidation and keeps your tip heating evenly, so every connection is smooth and reliable.
Cordless and Butane Soldering Irons for Portable Electronics Repair

Portable fixes need tools that work without a wall outlet. Butane soldering irons, like the BERKLING BSG-568, are great when you work away from your regular bench. They let you adjust the flame and temperature with a simple dial, so you get the heat you need, though they heat up a bit slower than electric models. They work well for quick on-the-go repairs, but you need a steady hand and some practice to make sure you don’t heat delicate parts unevenly.
Cordless electric soldering irons give you extra freedom on the job. You can move easily between work areas or job sites. However, they might lose power faster and take more time to get back to temperature, which can be a problem if you need steady heat for long work sessions. Both butane and cordless irons suit folks who know how to handle minor heat fluctuations, so beginners or people doing very detailed circuit repairs might want to use a tool with more consistent performance.
Ergonomics, Durability, and Maintenance Tips for Electronics Soldering Irons
A comfy soldering iron makes long repair sessions easier. Choose one with a good handle and balanced weight so your hand doesn’t get tired. For example, pick an iron that fits snugly in your hand. This will help you work on small parts without strain.
Real replacement tips usually last longer and work better than cheap copies. They keep heat steady and deliver solid results. For example, an iron with a genuine Hakko tip can perform better for longer, ensuring your repairs stay on track.
After you use your iron, clean it to help it last. Wipe the tip on a damp sponge between jobs and coat it with fresh solder right after you turn it off. Then, put the iron in a heavy-base stand to keep it safe from bumps and rust.
Building a Complete Electronics Repair Kit Around Your Soldering Iron

Quick Fix:
- What: Build a complete kit to repair electronics.
- Time: 20 min
- Skill: Beginner to Intermediate (just be careful with heat)
- Tools & Materials: Soldering iron, stand, tip set, damp sponge, 60/40 solder with flux pen, fume extractor. Upgrades: portable station, desoldering tool, heat mat, tweezers, cutters, magnifier.
- Cost: Starts low, add extras as needed
- Safety: Work in a well-ventilated area and keep hot tools secure
-
Gather Your Must-Have Items:
- Use a soldering iron with temperature controls so you don’t burn your parts.
- Set up a sturdy stand to keep the iron safe.
- Pick up a tip set with different shapes so you can handle tight spots or long traces.
- Keep a damp sponge nearby to clean the tip between jobs.
- Get some 60/40 rosin solder (it melts well) and a flux pen to help the solder stick.
- Add a fume extractor to clear away any harmful smells.
-
Consider Optional Upgrades:
- If you want more power on the go, think about a portable station like the Ifixit Fixhub. It even comes with a battery.
- A desoldering braid or pump helps fix mistakes by removing extra solder.
- A heat-resistant mat protects your work surface from burns.
- Fine-tip tweezers and precision cutters are great for handling small parts.
- Adjustable magnifiers let you see the tiny details and work with more care.
With these steps, you can put together a repair kit that makes working on circuit boards easier and safer. Enjoy your build and trust your toolkit to help you get the job done right!
Soldering Techniques and Safety Essentials for Electronics Repair
Quick Fix:
- What: Make strong, secure solder joints
- Time: About 10 min per joint
- Skill: Beginner to intermediate (practice on a Velleman PCB kit first)
- Tools & Materials: Soldering iron, 60/40 lead solder with rosin flux, circuit board, safety glasses, damp sponge
- Cost: Parts $3–$10
- Safety: Wear safety glasses and work in a well-ventilated area or use a fume extractor
Steps:
- Warm up the solder pad on your circuit board. Heating the pad helps the solder melt evenly.
- Apply your 60/40 lead solder (with rosin flux) onto the hot pad and component, not the iron tip. This makes the solder flow smoothly.
- When the solder flows and forms a shiny joint, remove the iron quickly. This avoids overheating and a weak, cold joint.
- Keep a firm grip and control the temperature. Steady, deliberate moves minimize burns and ensure a neat bond.
- Always wear your safety glasses and work in a ventilated spot to steer clear of harmful fumes.
- After soldering several joints, wipe the iron tip on a damp sponge and re-tin it with fresh solder. This cleaning prevents oxidation and keeps the tip effective.
- Finally, inspect each joint to be sure the solder bonds well for a long-lasting repair.
Tip: Practice on a Velleman PCB kit to build your skills and check your tool performance before working on more valuable equipment.
Final Words
In the action, this guide walked you through key buying factors and practical comparisons for a soldering iron for electronics repair. You saw how features like adjustable temperature, tip variety, and ergonomic design match real-world repair jobs. Step-by-step safety and maintenance tips make soldering less stressful and more effective. You now have the basics to build a reliable repair kit and complete projects with confidence. Keep these tips in mind and enjoy getting the job done right.
FAQ
What is the best soldering iron for electronics repair?
The best soldering iron for electronics repair offers adjustable temperature control, versatile tip options, and fast heat-up times. Popular choices include the Hakko 65W Digital Soldering Station and X-Tronic models, providing reliable precision.
What type of soldering iron should I use for electronics?
The type of soldering iron you use for electronics should deliver consistent heat control, support various tip shapes, and include safety features. Digital irons with PID controllers are excellent for delicate circuit work.
Is a 60W soldering iron good for electronics?
A 60W soldering iron is suitable for many electronics projects if it has accurate temperature regulation. It delivers sufficient power for small to mid-size repairs when paired with proper maintenance and tip care.
What size soldering iron do I need for electronics?
The ideal soldering iron size for electronics depends on your project. Smaller, lighter irons offer precision for tight spaces, while larger models provide robust performance for extended repair tasks.
What are some recommended soldering irons for electronics repair?
Recommended options include the pine64 PINECIL for portability, Hakko 65W Digital Soldering Station for bench work, iFixit IF145-494-1, and the Miniware TS101, all known for their build quality and control.
Does price affect the quality of a soldering iron for electronics repair?
Price often reflects a soldering iron’s precision, durability, and advanced features. Investing in a quality tool ensures consistent temperature control and longevity, which translates to safer and better repairs.
How do I choose a soldering iron kit for electronics repair?
When choosing a soldering iron kit, look for essential accessories like a sturdy stand, extra tips, a damp sponge, and quality solder wire. A complete kit provides convenience and supports reliable repair outcomes.