
Quick Fix: Make a Handmade Card
• What: Create a unique greeting card
• Time: 20 min
• Skill: Beginner
• Tools & Materials: Paper, stamps, markers, scissors, glue
• Cost: About $0–$5
• Safety: No special gear needed
-
Gather your supplies.
Pick up plain paper, stamps, markers, scissors, and glue from around your home. -
Fold your card.
Fold your paper in half to form a card shape. This gives you a clear front and back. -
Design your layout.
Decide where you want your stamps and drawings. Play around with placement before you glue anything down. -
Add your stamps and artwork.
Press your stamps firmly into the paper and fill in extra details with markers. Keep your lines light at first, then go over them to brighten your design. -
Let it dry, then enjoy your creation.
If you used glue, give it a few minutes to dry properly before using or sending your card.
Handmade cards show you care. They turn simple materials into a personal piece of art. With clear steps and fun ideas, you can quickly create a card that reflects your style and creativity. Have fun making your card, and let your creative side shine!
Comprehensive Step-by-Step Card Making Tutorial Overview
Quick Fix:
• What: Create a one-of-a-kind handmade card
• Time: Varies by project
• Skill: Beginner-friendly
• Tools & Materials: Starter kit (20 note cards and 3½″ x 5″ envelopes), stamps, ink pads, assorted paper/card stock, printable templates
• Cost: Varies – budget-friendly options available
• Safety: Work in a clean, well-lit space
- Start by watching a clear video demo and looking at easy-to-follow photos. These guides show you every step from start to finish.
- Gather your kit. Many tutorials suggest using a simple starter pack to build your skills, start with note cards and envelopes.
- Follow simple, numbered steps to place stamps, choose the right ink pads, and pick the best paper. If you need, pause the video to confirm you're doing each part right.
- Use downloadable templates that offer cool designs like slimline layouts and fun pop-up elements. They help you line up your design perfectly.
- Check out printable patterns and quick-reference guides that let you try new layouts and creative folds. These tools turn a tricky process into clear, repeatable steps.
Enjoy creating your personalized card with a process that builds your confidence one step at a time.
Essential Supplies and Materials for Card Making Tutorials

Quick Fix:
• What: Gather basic supplies for card making
• Time: 5 min
• Skill: Beginner
• Tools & Materials: Stamps, ink pads, paper or card stock, adhesives, die cut shapes, embossing folders, embellishments (sequins, ribbons)
• Cost estimate: $5–$20
• Safety snapshot: Work on a clean, flat surface
- Start by collecting the key tools. Use stamps to add design elements and ink pads for bright colors.
- Choose sturdy paper or card stock as your base. Standard note cards are 3½ in (9 cm) x 5 in (13 cm), and they match well with envelopes.
- Use embossing folders sized 5.5 in (14 cm) x 8.5 in (22 cm) to create texture. These can also work for slim cards measured at 5 in (13 cm) x 7 in (18 cm).
- Add adhesives to keep everything in place.
- Spice up your card with die cut shapes along with embellishments like sequins and ribbons for extra flair.
| Supply | Purpose |
|---|---|
| Stamps | Set the main design theme |
| Ink pads | Bring color and details to the stamps |
| Paper/Card Stock | Acts as the base for your card |
| Adhesives | Hold the parts together |
| Die Cut Shapes | Add style and depth |
| Embossing Folders | Create raised, textured designs |
| Embellishments | Give your card extra charm |
With these items ready, you set yourself up for easy card making. Follow step-by-step guides and try techniques like layering and embossing to create cards that are truly your own. Enjoy the process and have fun crafting!
Fundamental Steps in Beginner Card Making Tutorials
Quick Fix:
• What: Elevate your card design with a few simple tweaks
• Time: 20–30 min
• Skill: Beginner to intermediate
• Tools & Materials: Quality stamps, two types of ink, smooth paper, textured card stock
• Cost: Low-cost crafting supplies
• Safety: Follow basic craft guidelines
-
Select Your Stamps
Pick stamps that cut cleanly. Use one with fine details alongside one with a bolder shape to add a unique look to your card. -
Choose Your Ink
Start with a light wash of dye ink to lay down a bright base. Then add a coat of pigment ink to build deep shadows and texture for extra pop. -
Pick Your Paper and Card Stock
Mix smooth paper with a textured card base. Trying different weights, like 80 lb (43 kg/m²) with 110 lb (59 kg/m²), helps create a tactile and refined finish.
Advanced Card Design Tutorials and Creative Techniques

Quick Fix:
- What: Create eye-catching, advanced card designs.
- Time: Varies
- Skill: Advanced card making
- Tools & Materials: Die cutting tools, embossing folders (5.5″ x 8.5″ or 14 cm x 21.6 cm), hot foil, paper, cutting dies
- Cost: Parts and tools vary
- Safety: Use caution with sharp tools and work in a safe, well-lit space
- Watch a close-up video that shows how to apply hot foil accents and align embossing folders. This helps you see each step clearly.
- Try die cut inlay methods with layered paper collage for a mix of precision and creative flair.
- Follow along with video guides that give clear tips on aligning and layering elements for a smooth, pop-up effect.
- Experiment with projects like a Bold Retro Birthday Card that uses Distress Oxide Inks and hot foiling from the Aged to Perfection Collection. This project shows how detailed techniques can make your card stand out.
- Challenge yourself with subscription kits like the March 2026 Large Die of the Month Kit (26 cutting dies) or the Stitching Die of the Month Kit (17 dies) to discover new methods.
Tips:
- Take time to watch the video guides closely. They give real-time feedback that shows you the exact moments to add layers or sliders.
- Experiment with bright colors and different textures. It helps bring your design to life.
- If something doesn’t work at first, try adjusting your alignment. A small tweak can make a big difference.
Advanced Techniques:
- Die cut inlay
- Heat embossing with folders
- Hot foil accents
- Layered pop-up elements
- Interactive slider cards
Inspiring Themes and Ideas in Card Making Tutorials
Quick Fix:
- What: Get inspired by creative card ideas
- Time: Project-dependent
- Skill: Beginner-friendly
- Tools: Card stock, inks, embossing folders, rub-on transfers, and more
- Cost: Varies by project
- Safety: Work in a clean, organized space
Theme-based card tutorials mix many fun ideas to spark your creativity. Many projects show you how to bring birthday cards to life using simple die cuts (pre-cut shapes) and Distress Oxide inks that give a vintage look. Clear, step-by-step guides and lively color ideas help you try out your own style.
Baking-themed cards, like those in the Make It & Bake It Collection, add a tasty twist to your work. You can also try watercolor zodiac designs with hot foil accents for a little extra shimmer. Tutorials for spring and Easter cards mix cheerful images, think bunnies and eggs, to help you create cards that feel one-of-a-kind.
Seasonal projects for Halloween, Fall, and the holidays use techniques like rub-on transfers and embossing folders for neat, simple layouts. These tutorials cover both old-school and modern ideas, giving you fun, colorful crafts that work great for any celebration.
Troubleshooting Tips and Downloadable Templates in Card Making Tutorials
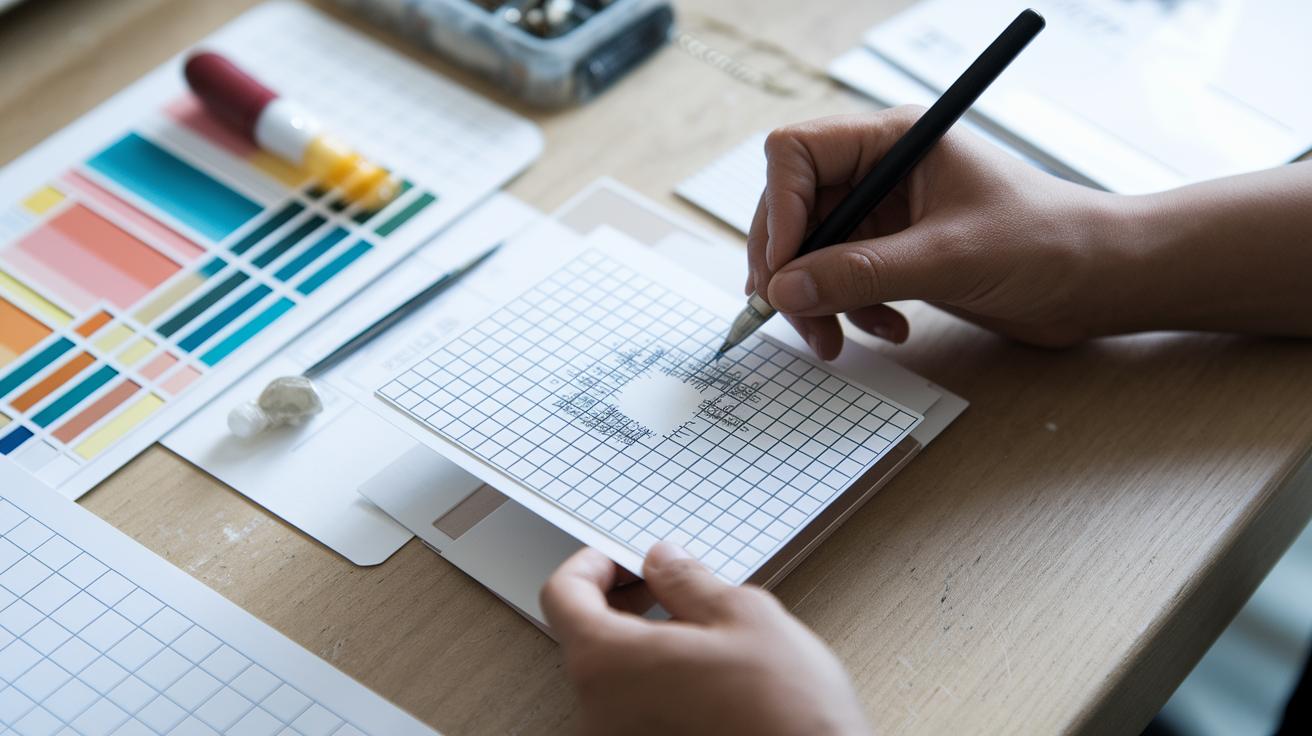
Quick Fix:
- Outcome: Keep your card projects neat and fix common crafting issues.
- Time: 10 min
- Skill: Beginner
- Tools & Materials: Clean cloth, adhesive, precision tools, grid stamp, and downloadable templates
- Cost: Low (parts under $10)
- Safety: Work in a clear area; follow adhesive instructions
Steps:
- Let each ink layer dry fully.
- If ink smudges, gently dab excess with a clean cloth.
- Use precision tools to spread adhesive evenly.
- Keep your design straight by using a grid stamp.
- Download templates to guide your layout and avoid misalignment.
Sometimes ink may spread more than planned or layers may shift while drying. In these cases, waiting a bit longer between layers and using clear tools can save time and frustration. Downloadable templates help you set up your design with fun fold patterns, slim layouts, and detailed popup instructions. They work hand in hand with free online video guides and step-by-step card crafting lessons, making it easier to spot fixes and learn new techniques. Use these simple remedies every time a crafty challenge comes up, and keep your projects running smoothly.
Final Words
In the action, we broke down the process from selecting supplies to mastering creative techniques and troubleshooting common issues.
Each section gave clear, step-by-step instructions that guide you from simple projects to elaborate card designs.
You learned how practical tools and templates can boost your skills and save you time and money.
These card making tutorials offer a hands-on approach that builds confidence and inspires your next creative endeavor.