
Quick Fix: Tin Can Planters
• What: Turn an old tin can into a cool garden planter
• Time: 15–20 min per can
• Skill: Beginner (no special skills needed)
• Tools & Materials: Tin can, dish soap, water, sponge, outdoor paint, small brush, optional sealant
• Cost: $5–$15 per can
• Safety: Wear gloves when cleaning and paint in a well-ventilated area
- Clean the can. Rinse it with warm, soapy water and dry it with a clean cloth.
- Remove any sharp edges carefully. You can smooth the rim with a file or cover it with tape.
- Paint the can. Use outdoor paint and a small brush to cover the can. Let it dry for 5–10 min.
- Add your design. Use different colors or stencils to give it a personal flair.
- Seal the design (optional). For extra protection, spray a clear sealant once the paint is dry.
Now you have a stylish, eco-friendly planter to brighten your garden. Enjoy turning trash into treasure!
Essential Upcycling Steps for Tin Can Planters
Quick Fix:
• What: Transform used tin cans into stylish planters
• Time: ~30 min per can
• Skill: Beginner, just follow the steps
• Tools & Materials: Tin cans, nail, hammer, sponge brush, acrylic paint, waterproof sealer, outdoor Mod Podge, pre-cut rope, pansy (or another small bloom)
• Cost: Low – most items you may already have at home
• Safety: Wear gloves; work carefully with a hammer and nail
- Start by stripping the cans. Remove any paper labels and sticky residues so you have a clean base. Rinse out the inside thoroughly.
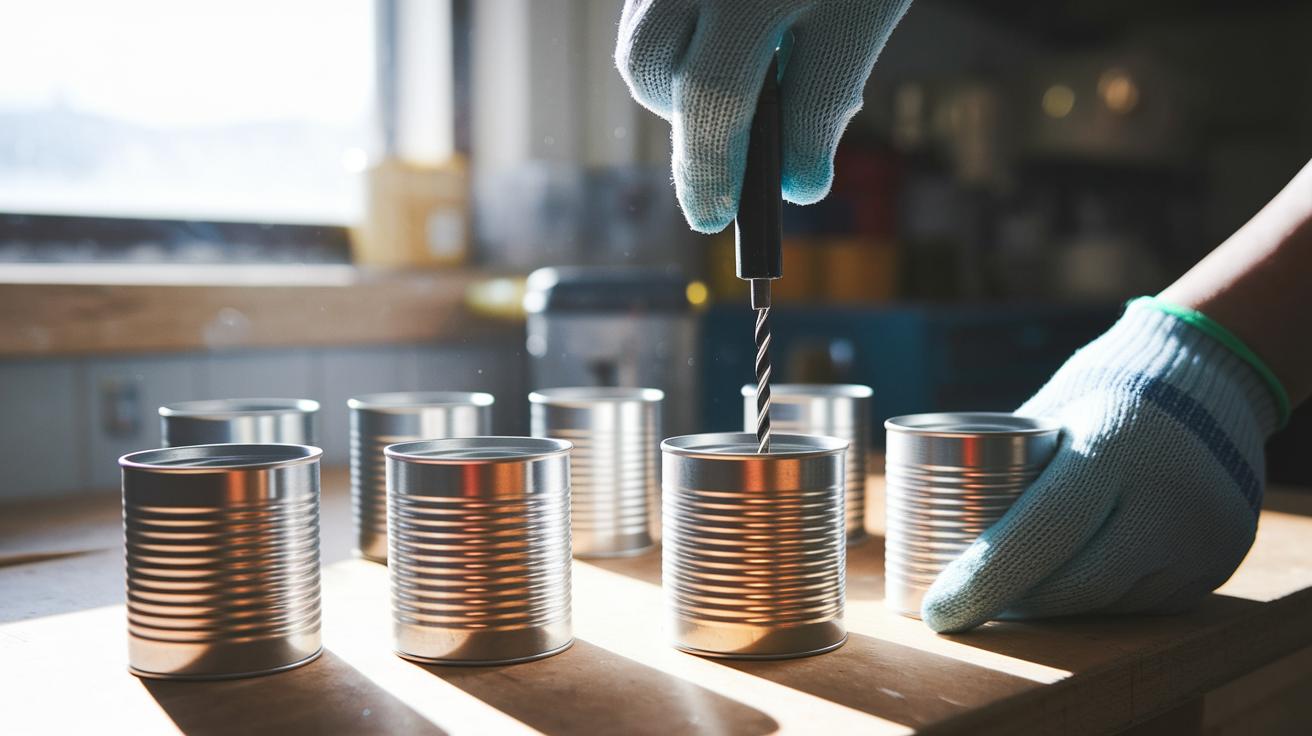
- Create drain holes. Hammer a nail through the bottom five times. This lets water drain out and keeps your plant happy.
- Seal the inside. Brush on a waterproof repair sealer carefully, making sure not to cover the drain holes.
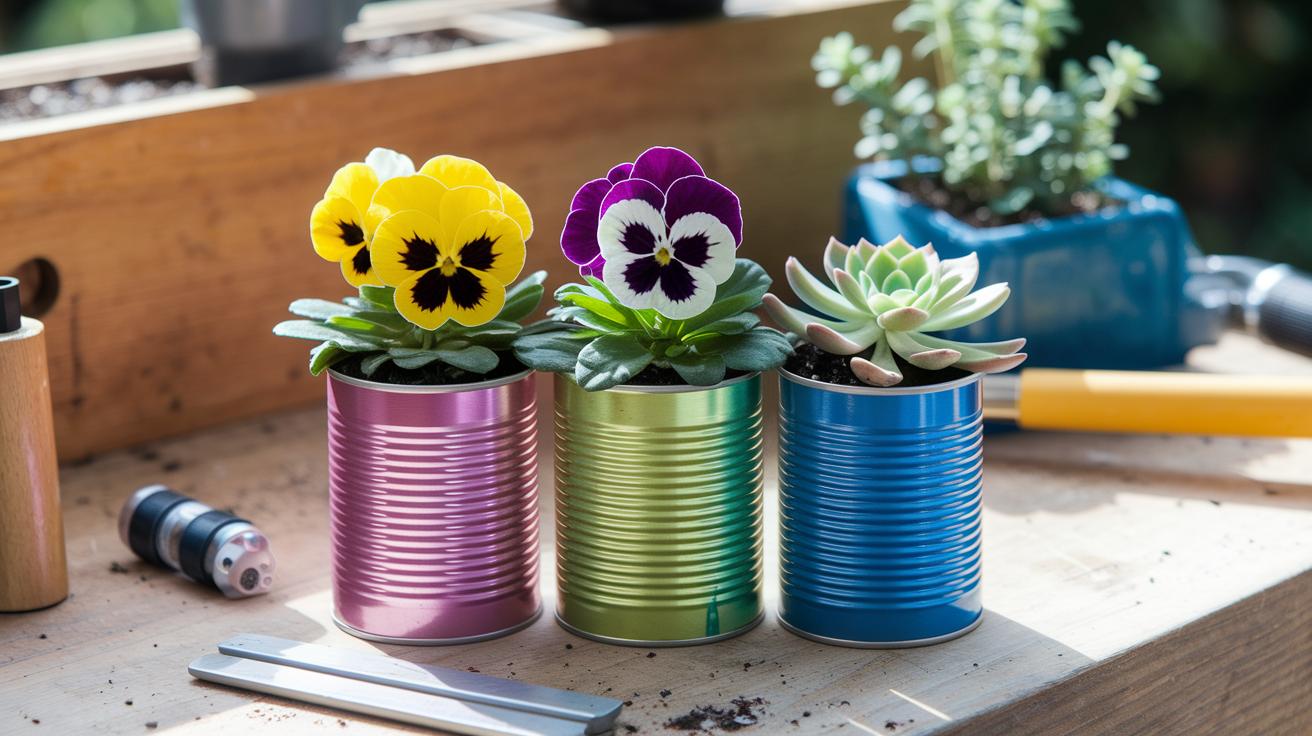
- Paint your can. Use acrylic paint applied with a sponge brush. Dab the paint in to fill in textured areas or smooth it out for a flat finish.
- Add artistic touches. Brush on outdoor Mod Podge and gently lay thin napkin pieces over the can for a creative look.
- Hang or display your planter. Stick a pre-cut rope at a 45° angle using glue. Plant a single bloom like a pansy to keep the look neat and avoid crowding.
This upcycle project turns everyday tin cans into unique planters that brighten up your home and garden. It’s an eco-friendly way to recycle while adding a fun, personal touch to your outdoor decor. Enjoy your new planter and feel proud of your sustainable creation!
Materials and Tools for Tin Can Planter Upcycling

Good supplies make your upcycle strong and look neat. They help your project last.
- Soup or vegetable tin cans: Pick cans that are clean, without labels, and show little denting.
- Nail and hammer or a 1/8 in (3 mm) drill bit with a drill: Use these to add drainage holes.
- Acrylic paints: Choose a variety of colors made with quality pigments.
- Sponge brush: This helps you spread paint evenly.
- Outdoor Mod Podge: A weatherproof glue that seals the surface.
- Waterproof repair sealer: Use this to keep rust at bay.
- Cotton or jute rope: Pre-cut at a 45° angle to give a tidy finish.
- Protective gloves and safety glasses: Put these on for safe work.
Always check that your supplies are in good condition. Look for cool, unique tin cans at local thrift stores or repurpose unused pantry cans. Mixing used items with new, quality materials makes for a smart, eco-friendly project.
Preparing and Cleaning Tin Can Planters
Quick Fix:
• What: Clean tin cans to use as planters
• Time: 15 min + drying time
• Skill: Beginner
• Tools & materials: Protective gloves, safety glasses, basin, warm soapy water, fine-grit sandpaper
• Safety: Wear gloves and glasses to avoid cuts
- Put on your gloves and safety glasses so you stay safe from sharp edges.
- Fill a basin with warm, soapy water. Soak the tin cans for about 10 min to help the paper labels and glue come off.
- After soaking, peel off the paper labels and any sticky residue.
- Rinse each can well under running water.
- Let the cans air-dry until there is no moisture left.
- Use fine-grit sandpaper to gently smooth any rough, sharp edges. This step makes them safer and ready for paint or other finishes.
Your cleaned and prepped tin cans are now set to become stylish, DIY planters that brighten up any space.
Creating Drainage and Sealing Techniques for Tin Can Planters
Quick Fix:
• What: Improve tin can planter drainage and keep rust away.
• Time: 10 min
• Skill: Beginner (simple tasks)
• Tools & Materials: small pin, fine brush, silicone-based sealer, hammer and nail or drill with 1/8-in (3 mm) bit, gloves, safety glasses
• Cost: Parts $3–$10
• Safety: Wear gloves and safety glasses
- Check your planter's drainage by pouring 1 cup (240 ml) of water over the tin can.
- If the water does not exit quickly, clear the holes gently with a small pin or a fine brush.
- For extra moisture resistance, apply a silicone-based sealer on areas away from the drainage holes.
- If you notice rust or water stays too long, make sure no sealant is blocking the holes. Clean them with a fine brush and test the water flow again.
| Tool or Method | Why You Need It |
|---|---|
| Hammer and Nail | Punch drainage holes |
| Drill with 1/8-in Bit | Create holes another way |
| Waterproof Sealer | Stop rust inside the can |
Decorating Upcycled Tin Can Planters: Paint, Decoupage & Embellishments
Give your tin can planters a fresh look using simple decoration methods. You can use paint, decoupage (a way to glue paper like napkins onto a surface), rope accents, stencils, or embossing to add style. Choose the ideas that fit your taste or mix them together to create a piece that brightens any patio or garden area.
- Paint with acrylics and a sponge brush. You can dab the paint into the ridges or smooth it for even coverage.
- Use decoupage by brushing on outdoor Mod Podge (a weatherproof glue) and laying a thin napkin piece. This adds a fun, layered charm.
- Add rope accents by gluing pieces of pre-cut rope in a spiral or along the top rim to give a rustic touch.
- Use stencils or punch small patterns with a hole punch to create gentle light effects.
- Try embossing to add subtle texture to the metal while keeping the design balanced.
Decoupage for Outdoor Use
Choose an outdoor Mod Podge that works like weatherproof glue to keep moisture away. Brush a thin layer of glue over the can, then gently lay a neatly trimmed napkin piece on top. Press it carefully to remove wrinkles. Let this first layer dry completely before adding another for a richer look. For best results, let your can sit for 24 hours so the decoupage fully sets and protects it from rain.
You can mix techniques to make your planter even more unique. Try a painted background with decoupage cutouts or add rope accents to merge different styles. Adjust the layers and textures until your upcycled planter perfectly fits your garden or outdoor area.
Planting and Maintaining Upcycled Tin Can Planters
Quick Fix:
- What: Set up a tin can planter display
- Time: 30 min setup; seasonal upkeep as needed
- Skill: Beginner-friendly; no advanced gardening skills required
- Tools & Materials: Tin cans, small plants (like pansies or shallow-rooted succulents), well-draining potting mix, sealant, watering can, scissors
- Cost: Parts $3–$10
- Safety: Use a stable work area and let the sealant dry fully
- Fill each tin can with a well-draining potting mix, leaving ½ inch (1.3 cm) of space at the top.
- Plant small blooms or succulents with shallow roots in the can so they fit their compact space.
- Check the soil every week; water when it feels a bit dry.
- Make sure excess water can drain easily through the can’s holes.
- Rotate the cans every 7–10 days to give your plants even sunlight.
- Trim plant growth to prevent crowding.
- Every season, add a new coat of interior sealant to keep rust away.
Place your planters in spots that get steady sunlight. In warm weather, monitor the soil so it stays just moist enough, not too wet and not too dry. When the weather turns cool, move your planters indoors or to a sheltered place to protect the plants. Changing the arrangement now and then can also freshen up your garden or porch look. With these clear steps and a bit of creative touch, your upcycled tin can planters will brighten up your outdoor space in a sustainable way.
Final Words
In the action, we've shown you quick steps to convert tin cans into charming planters. You read how to clean cans, add drainage, seal securely, decorate with creative flair, and care for your tiny garden.
Each step keeps the project simple and eco-friendly. Use these tips on how to upcycle tin cans into planters to breathe new life into your outdoor or indoor space.
Enjoy the process and watch your ideas bloom!
FAQ
How to upcycle tin cans into planters step by step?
The process to upcycle tin cans involves cleaning the can, creating drainage holes, sealing the interior, decorating with paint or decoupage, and finally, planting small blooms for a low-cost, eco-friendly project.
How can I easily upcycle tin cans into planters?
The approach to easily upcycle tin cans starts with removing labels, washing and drying the cans, forming drainage holes using a nail, and finishing with waterproof sealer and creative decoration for a simple DIY planter.
How do I decoupage tin can planters?
The technique to decoupage tin can planters uses outdoor Mod Podge to layer thin, stylish napkin designs over a painted surface, adding a unique decorative touch that also helps protect the can.
What tin can planter DIY ideas are available?
The tin can planter DIY ideas include repurposing soda cans, painting in bold colors, adding rope accents for hanging displays, and using decoupage techniques to create artful, personalized planters.
What recycled tin can craft ideas work best for planters?
The best recycled tin can craft ideas involve using cleaned soup or vegetable tins, preparing drainage holes, applying a waterproof interior sealer, and then decorating with paint or decoupage to create an attractive planter.