
DIY Birthday Card – Quick Fix
What: Create a custom birthday card with your personal touch
Time: 15 min
Skill: Beginner
Tools: Plain paper, markers, colored pencils, scissors, glue
Cost: Under $5
Safety: Handle scissors carefully
- Gather your supplies.
- Start with a simple design on plain paper.
- Add doodles, words, or a photo to share a piece of you.
- Splash on some color and small details to make it uniquely yours.
Your handmade card will add that extra sparkle to any birthday celebration. Enjoy the process and let your creativity shine!
Essential Steps for Making a Personalized Birthday Card
Quick Fix:
• What: Create a fun, personalized birthday card that surprises the recipient.
• Time: 30 min
• Skill: Beginner (a little crafting flair helps)
• Tools & Materials: 5.5×4.25 in (14×11 cm) sturdy cardstock (65–80 lb), scissors or a scoring board, a pencil, markers or colored pencils, a mini balloon, craft glue or double-stick tape
• Cost: Parts $3–$10
• Safety: Watch your fingers when using scissors
-
Choose your cardstock.
Pick sturdy cardstock that measures 5.5×4.25 in (14×11 cm) and weighs between 65 and 80 lb. This paper holds up well and makes your card feel high quality. -
Trim the paper.
Use sharp scissors or a scoring board to cut the cardstock neatly. Cutting it well now helps the card look clean when you fold it later. -
Plan your design.
Lightly sketch your layout with a pencil. Map out where your text, images, and any pop-up details go. For example, mark a spot for a small balloon. -
Write a hidden message.
Before you stick on the balloon, write your secret note on it. Once the birthday person inflates the balloon, your surprise message will appear. -
Add a fun twist.
Try including a pull-tab or a layered cut-out that pops up when opened. This simple trick adds extra charm to your card. -
Finish your design.
Go over your pencil marks with markers or colored pencils. Attach the balloon securely and use craft glue or tape for any loose parts.
Enjoy making a card that is creative, personal, and sure to bring a smile!
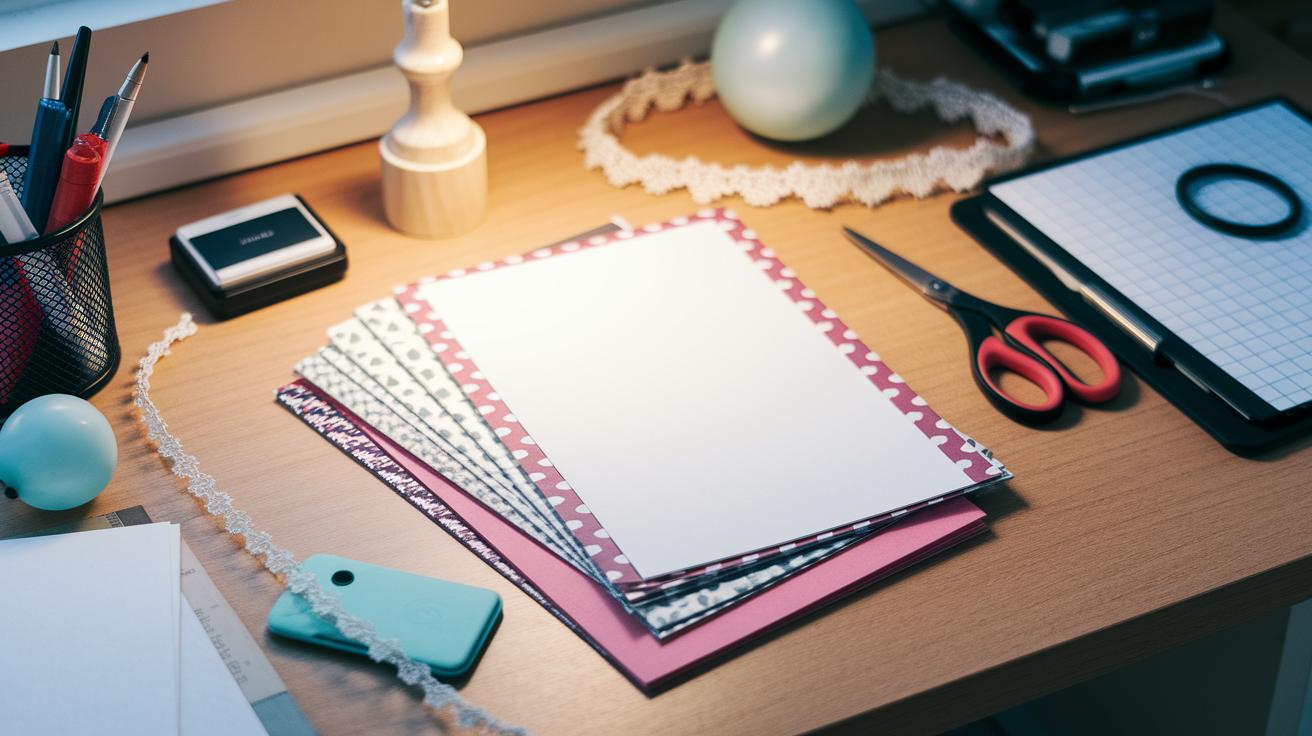
Choosing Materials and Craft Supplies for Birthday Card Making
Quick Fix:
What: Make a sturdy and fun birthday card.
Time: 20–30 min
Skill: Beginner
Tools & Materials: 65–80 lb cardstock (about 176–224 gsm), patterned paper, mini balloons, ink pad, lace trim, double-stick tape, foam tape, craft glue, bone folder, precision scissors, scoring board
Cost: ~$10–$20
Safety: Use scissors with care and work on a stable surface.
- Choose a Strong Base: Pick a 65–80 lb cardstock so your card feels firm and durable.
- Add Patterned Flair: Layer in patterned paper behind your design to boost texture and color. It works great for pop-up cards.
- Create Fun Elements: Tuck in mini balloons or add hidden messages. Try using an ink pad and lace trim to make a handprint or birthday cake effect.
- Bond Your Layers: Use double-stick tape for a clean hold, foam tape for extra dimension, or craft glue when you need a liquid adhesive. Each one helps keep your parts in place.
- Shape with Precision: Use a bone folder for sharp folds, precision scissors for neat cuts, and a scoring board to guide your folds.
Pick your supplies carefully, follow these steps, and your card will be both tough and creatively inspiring. Enjoy the process and happy crafting!
Creative Design Tips for Making Unique Birthday Cards
Quick Fix:
What: Create a special birthday card with fun, interactive features
Time: 30 min
Skill: Beginner
Tools & Materials: Cardstock, pencil, bone folder (for neat folds), scissors, markers, and stickers
Safety: Work on a clear, flat surface
-
Start with a simple sketch.
Use a light pencil to draw your idea. Plan where each cut and fold goes. For example, draw a child's handprint and add simple flamingo shapes with little hearts around it. -
Add interactive elements.
Cut small shapes that pop up when the card opens. Attach pull tabs to show secret messages or fun pictures. -
Use a creative cut-and-fold method.
Score the cardstock with a bone folder so your folds are sharp. Trim the edges with precision scissors. You can even cut a window shape and place a different patterned paper behind it to add depth. -
Include handprint art for a personal touch.
Press an ink pad on a hand and stamp it on the card. Then, turn the handprint into a cute design, like a cake decorated with little handprint candles. -
Pick a color palette that fits the birthday person.
Use soft pastels and light colors for kids, or bold, bright colors for adults. Mix colors in your drawings to keep the card cheerful and balanced. -
Finish with a few extra touches.
Add small stickers or a bit of metallic ink to highlight key parts. A little sparkle on a pull tab or around the cake detailing can bring your design to life.
Enjoy creating your card and feel free to adjust these tips to match your style and the birthday person’s taste!
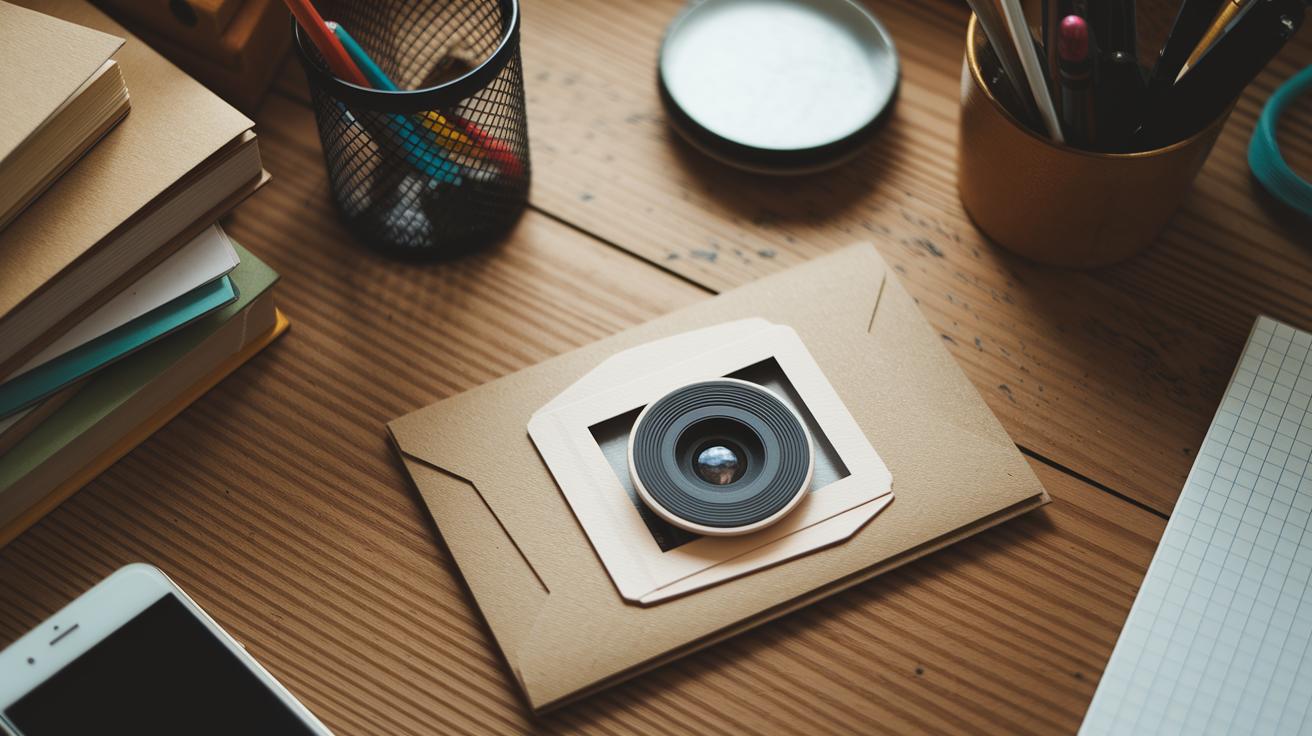
Incorporating Photos and Digital Templates in Birthday Card Making
Quick Fix:
• What: Create a modern, personalized birthday card that mixes printed photos and digital templates
• Time: 30 min
• Skill: Beginner; just follow the steps
• Tools & Materials: Free online greeting maker, digital design software, printer, photos, and paper
• Cost estimate: Parts $0–$10
• Safety: Use safe tools when trimming paper
- Download a free digital template from an online greeting maker. Pick one that you can adjust to your liking.
- Insert your photo into the template. For a camera-themed card, try fitting a 2×3 in (5×7.5 cm) picture into a die-cut “lens” shape.
- Open the design in your digital design software. Adjust the brightness and contrast so the photo matches the card’s other details. Tip: A brighter image can show more details.
- Save your work as a print-ready PDF. This file keeps your text, pictures, and design crisp when printed.
- Print the card carefully and trim along the edges. Add your own hand-drawn touches for a unique, personal finish.
| Key Measure | Requirement |
|---|---|
| Resolution | 300 dpi |
| Bleed | 0.25 in (0.64 cm) |
Assembly Tricks and Finishing Touches for Birthday Card Making
Quick Fix:
• What: Elevate your birthday card with a professional look
• Time: 15 min
• Skill: Beginner (basic crafting skills)
• Tools & Materials: Cardstock, foam tape, scoring board, ribbon, metallic ink pen, envelope, stickers or washi tape
• Cost: Parts $3–$10
• Safety: Work on a stable surface and keep sharp tools careful
- Add a 3D touch: Stick foam tape along the center crease of your cardstock. This gives your card a raised look that feels special.
- Get crisp folds: Run your cardstock over a scoring board. This makes neat, uniform creases so your card folds perfectly.
- Decorate with flair: Place a ribbon along the top or bottom edge. Then write a short message in metallic ink (like “Celebrate!”) for a festive pop.
- Check your envelope: Use an envelope that fits the A2 size (4.375×5.75 in / 111×146 mm). This ensures your card fits right and looks balanced.
- Finish with style: Seal your design with custom stickers or washi tape. This secures loose edges and adds a final decorative touch.
Before you give out your card, let all the adhesive dry completely.
Envelope Design and Presentation Techniques for DIY Birthday Card Making

Quick Fix:
• What: Make a custom envelope for your birthday card
• Time: 10 min
• Skill: Beginner (just follow the steps)
• Tools & Materials: Recycled kraft or scrap paper, scissors, ruler, soy-based glue (eco-friendly adhesive), stamps, stickers, or washi tape
• Cost: Parts $1–$5
• Safety: Use scissors carefully
- Cut your recycled paper to A2 size (about 4.375×5.75 in or 111×146 mm).
- Fold the paper into an envelope shape using a simple roll and fold method.
- Seal the edges with soy-based glue to keep it secure.
- Decorate the envelope with matching stamps, stickers, or washi tape to tie it together with your birthday card.
Using recycled and tree-free paper keeps your project green and affordable. Try adding a personal touch with a hand-drawn sticker or printed motif to make the envelope truly yours. Happy crafting!
Final Words
In the action, you've learned to put together a personalized birthday card from start to finish. The guide walked you through choosing sturdy paper, arranging creative designs, adding photos or digital elements, and perfecting the final touches. Each step helps you create a unique piece that is both fun and heartfelt. Keep these tips in mind if you're making birthday card that truly stands out. Enjoy turning your ideas into memorable celebrations and take pride in your DIY skills.
FAQ
How do I create a birthday card online for free?
Creating a birthday card online for free uses digital tools that offer customizable templates. You simply choose a design, add photos and messages, and download or share your personalized card without cost.
How can I make a birthday card with a photo?
Making a birthday card with a photo means using an online editor or digital template that lets you insert and adjust your image alongside text and decorative elements for a balanced, attractive layout.
How can I make a birthday card that is easy and beautiful?
Making a birthday card easy and beautiful involves planning your design, choosing matching colors and fonts, and adding creative touches like pop-ups or hand-drawn details to give the card a polished look.
How do I make a birthday card from scratch?
Creating a birthday card from scratch requires gathering cardstock, cutting it to the proper size, sketching your design, and embellishing with interactive features and creative paper art for a unique final product.
What should I consider when making a birthday card for adults?
Making a birthday card for adults means selecting a refined color palette and clean design. Personalize the message and use quality materials to create a sophisticated, thoughtful card.
How do I design a birthday card for a boy?
Designing a birthday card for a boy involves choosing bold colors and fun themes like sports or adventure. Add dynamic graphics or playful elements that reflect his interests for an engaging card.