
Quick Fix
• What: Create a unique Mother’s Day card
• Time: 30–45 min
• Skill: Beginner
• Tools & Materials: A sturdy card (or cardstock), markers, stickers, glue, and any craft bits you like
• Cost: Low-cost crafts
• Safety: Keep scissors and glue away from little hands
- Pick a strong card base. Find a piece of cardstock that feels firm in your hand.
- Set up your space. Lay out your markers, stickers, and glue on a clean table so you can reach everything easily.
- Add your personal touch. Draw, write, or stick on small details that show your love and thanks.
- Let it dry and admire your work. When the card is dry, you have a heartfelt token ready to brighten her day.
Essential Steps for Making Your Mother’s Day Card
Quick Fix:
• What: Create a heartfelt, custom Mother’s Day card
• Time: 30–45 min
• Skill: Beginner
• Tools & Materials: 5×7″ card or square design, 80–100 lb (216–271 gsm) cardstock, editable printable template, ruler, scoring tool (or bone folder), cutting tool
• Cost: Home materials or around $0–$10
• Safety: Work on a flat surface and handle cutting tools with care
-
Choose Your Card Base
Pick a 5×7″ card or a square fold for your project. Use heavy cardstock (80–100 lb, 216–271 gsm) so your card feels sturdy. Find an editable template to customize with your favorite fonts and images. -
Set Up Your Workspace
Clear a flat table and lay down a protective mat. Arrange your ruler, scoring tool (or bone folder), and cutting tool so you have everything within reach. This helps keep your cuts clean and safe. -
Cut and Fold the Card
Use your ruler to mark straight lines. Score along the crease with your bone folder for a crisp fold. Do a test fold to check that the crease is straight before you complete the cut. Work slowly for neat, even edges. -
Decorate the Card
Add your personal touch with layered paper, floral details, or even a pop-up element on the front and inside. Mix complementary colors to catch the eye. Finish it off with a handwritten note to add warmth and personality.
Materials and Tools for Your Mother’s Day Card Project

Quick Fix:
• What: Make a special Mother’s Day card that shows you care.
• Time: 15 min
• Skill: Beginner
• Tools & Materials: Cardstock, patterned paper, cutting tools, scoring tool, adhesives, decorations, pens
• Safety: Keep your work area tidy to avoid paper cuts
Before you start, gather all your supplies. A clear workspace helps you work faster and have more fun with your card. Here is what you need:
• Cardstock (5×7 in [12.7×17.8 cm] cards or 8.5×11 in [21.6×27.9 cm] sheets)
• Patterned paper or printed inserts
• Cutting tools like scissors, a craft knife, or a paper trimmer
• A scoring tool or bone folder for neat folds
• Glue stick and double-sided tape for sticking pieces together
• Embellishments such as ribbon, washi tape, buttons, and stickers
• Pens like fine-tip pens and brush markers for writing
You can also add extras like pop-up parts or an embossing folder for extra style. For a budget twist, try using recycled magazine pieces to form a collage.
Check your supplies before you begin. With everything ready, you can focus on making a heartfelt, one-of-a-kind card that brightens your mom’s day.
Creative Design Ideas for a Unique Mother’s Day Card
-
Floral pop-up bouquet
When you open this card, layered petals bloom like a mini garden. It unfolds to reveal a secret garden full of life. Expect to spend about 20–30 min on assembly. -
Watercolor wash front
Start with a soft pastel wash as your background and add a hand-lettered greeting on top. Use light, flowing strokes for a calm look. Try matching pale blue with green (or similar colors) for a soothing vibe. -
Photo collage insert
Create a mini frame from sturdy cardstock and arrange your favorite family snapshots inside. The photos tell a story of cherished memories. Use borders with contrasting colors to make your images pop. -
Origami butterflies
Fold small butterflies from paper and secure them onto the card’s cover. Each little butterfly adds movement and a burst of color. Consider using colors like orange and blue to bring extra flair. -
Minimalist monochrome
Keep the design clean with simple lines and one accent color. Add gold foil lettering for a modern touch that makes your handwritten message stand out.
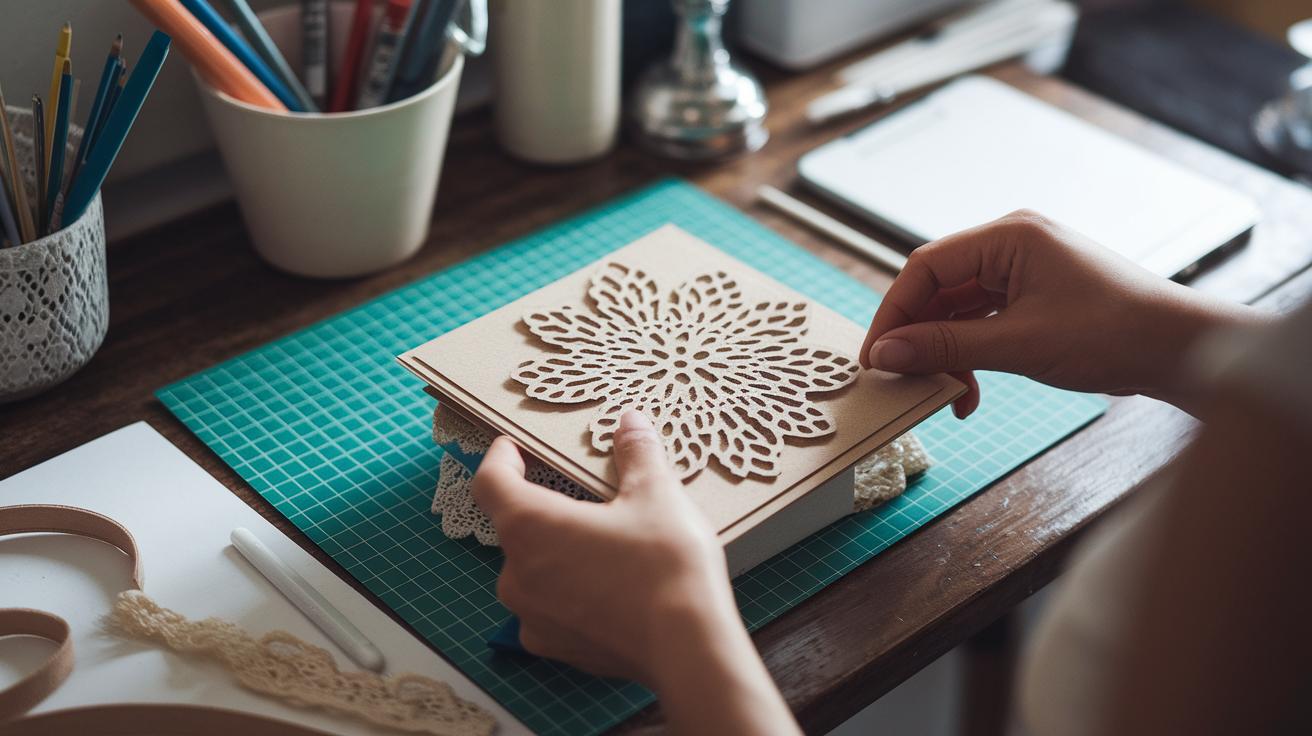
Precision Folding and Cutting Techniques for Your Mother's Day Card

Quick Fix:
• What: Make a pro-looking Mother's Day card with neat folds, artsy edges, and a pop-up element.
• Time: 20 min
• Skill: Beginner (just take your time and stay focused)
• Tools & Materials: Bone folder, ruler, specialty scissors, craft knife, tape
• Cost: Low-cost if you already have these tools
• Safety: Work slowly and handle the craft knife with care
Use a bone folder and ruler to score crisp 90° crease lines along your card. Run the bone folder along the marked line to create smooth, clear folds. This gives your card a balanced, professional look that opens evenly.
For adding decorative flair, trim the card’s edges with specialty scissors. Cut curved, scalloped, or stitched-look borders along the sides. Work slowly and apply steady pressure for smooth, even cuts without jagged edges.
To bring the card to life, add a fun pop-up element. Here’s how:
- Mark the spot for your pop-up on the card base.
- Use your ruler and bone folder to score light crease lines forming a V shape.
- Cut along these lines carefully with a craft knife or scissors.
- Fold along the crease slowly to form the pop-up, taking care to avoid tearing the paper.
- Reinforce the fold with a small strip of tape to boost its durability
By following these steps, you’ll create a polished, eye-catching card that shows off your creative skills and makes mom feel special.
Adding Personal Touches to Your Mother’s Day Card
Quick Fix:
- What: Make your Mom's Day card extra special with personal touches.
- Time: 10–15 min
- Skill: Beginner
- Tools & Materials: Pen, scrap paper, card, envelope, liner paper or wax seal
- Cost: $0–$10
- Safety: None needed
-
Write a Heartfelt Note.
Jot down a short, warm message on scrap paper first. Recall a favorite memory or an inside joke that makes you both smile. This draft sets the tone for your card. -
Practice Your Brush-Lettering.
Use firm pressure on downstrokes and light pressure on upstrokes. Run through your alphabet a few times. A quick tip: good brush control makes your letters come alive. -
Style Your Envelope.
Decorate your envelope with matching liner paper or try a wax seal for fun. This extra flair brings a unified look from the moment your mom sees the envelope. -
Follow These Quick Handwriting Tips:
Tip Action Paper Draft Write your message on scrap paper first Consistent Slant Keep your letters angled the same way Guideline Use a sheet to guide your writing
These steps add a cozy, personal vibe to your card and envelope, turning your project into a heartfelt keepsake.
Embellishment Techniques to Elevate Your Mother’s Day Card
Quick Fix: Upgrade your card now
• What: Add flair with layered shapes, ribbon, foil, and embossing
• Time: 20–30 min
• Skill: Beginner to Intermediate
• Tools & materials: Cardstock, fabric glue, ribbon, lace, foil pen or laminator, emboss powder, heat gun
• Cost: Parts $5–$15
• Safety: Use caution with heat tools
-
Layered Die-Cut Shapes
Cut out flower petal shapes from cardstock in different sizes. Stack these pieces to create a 3D flower effect that pops as soon as the card opens. -
Ribbon and Lace Trims
Use a small brush to spread fabric glue along the card edges and press on a ribbon or lace strip. This adds a soft, refined border that makes the card feel extra special. -
Metallic Foil Accents
Outline text or design elements with foil sheets or a foil pen. The shiny details catch the light well and give your card a touch of luxury. -
Embossed Backgrounds
Sprinkle heat emboss powder along a drawn design and use a heat gun to set it. This creates a raised, textured background that frames your card’s other features.
| Tool | Accent Effect | Dry Time |
|---|---|---|
| Foil pen | Shiny text | Immediate |
| Lace trim | Textured border | 5 min |
Digital Tools and Printables for Mother’s Day Card Design
Quick Fix:
- What: Create a custom Mother’s Day card that mixes digital design with hands-on craft.
- Time: 30–45 min
- Skill: Beginner
- Tools & Materials: PC or tablet with internet, Canva or similar online design tool, free photo editor (like GIMP), printer with high-resolution settings, heavy cardstock, vellum paper, ruler, and craft knife.
- Cost: $0–$20
- Safety: Be careful when using sharp tools
Steps:
- Open Canva and search for "Mother’s Day card." Pick a design that you like.
- Edit the fonts and colors to match her style, then download the card as a PDF.
- To add a personal touch, open a favorite family photo in a free app like GIMP. Crop it into a heart shape and add a simple drop shadow.
- Print any floral clip art or other digital elements on vellum paper.
- Carefully stick the printed elements onto the heavy cardstock. This layering adds texture and makes your card pop.
- Before printing your design, adjust your printer settings for high-resolution output.
- Load the correct paper type into your printer and calibrate the colors.
- Use a ruler and a craft knife to trim the design neatly.
Final Words
In the action, this guide gave you a quick roadmap to making mother's day card with clear steps and simple materials. You learned how to set up your workspace, score and fold accurately, and layer design touches that make every card unique. Each section offered easy tips and clever ways to add personal flair without breaking the bank or wasting time.
Keep experimenting and enjoy the process as you create heartfelt cards that bring a smile.
FAQ
What are essential steps for making a Mother’s Day card?
The essential steps for making a Mother’s Day card begin with selecting a card base and printable template, preparing your workspace with a protective mat and scoring tool, then cutting, folding, and decorating with a handwritten note.
What materials and tools are required for a Mother’s Day card project?
The materials and tools for a Mother’s Day card project include cardstock or blank cards, patterned paper, cutting tools like scissors or a craft knife, a scoring tool, adhesives, embellishments, and fine-tip pens for a personal touch.
What creative design ideas can I try for my Mother’s Day card?
The creative design ideas for your card include a floral pop-up bouquet, watercolor wash front with hand-lettering, photo collage insert, origami butterflies, and a minimalist monochrome design with a single accent color for a unique look.
How do I use precision folding and cutting techniques in my card making?
The precision folding and cutting techniques involve scoring folds with a bone folder, trimming decorative edges for unique borders, and using a basic V-fold pop-up method while taking care to prevent any paper tearing during assembly.
How can I add personal touches to my Mother’s Day card design?
The personal touches in your card design come from including a heartfelt handwritten note, practicing simple brush-lettering for smooth calligraphy, and even adding matching envelope liners for added sentiment.
What embellishment techniques can boost my card’s appearance?
The embellishment techniques to boost your card’s appearance include layering die-cut shapes for dimension, applying ribbon or lace trims with fabric glue, using metallic foil accents, and incorporating embossed backgrounds for a refined finish.
How do I incorporate digital tools into my Mother’s Day card design?
The digital tools for your card design allow you to use Canva templates, crop family photos with free editing software, and create a hybrid design by printing digital elements to adhere over your cardstock for a modern touch.