
Quick Fix: Fix Your Oven's Heat
• Outcome: Get your oven heating again
• Time: 30 min
• Skill: Beginner
• Tools: Multimeter, screwdriver, replacement thermal fuse (if needed)
• Safety: Unplug the oven before you start
- Unplug the oven to keep safe.
- Remove the access panel with a screwdriver.
- Find the thermal fuse inside.
- Set your multimeter to the ohm (resistance) setting and test the fuse.
- If the reading is off, the fuse is blown.
- Remove the bad fuse and snap in the new one.
- Reattach the panel and plug your oven back in.
- Test the oven to make sure it heats up.
oven thermal fuse replacement: Simple, Safe Steps
Quick Fix
• What: Replace a blown oven thermal fuse to get your oven heating again.
• Time: 30 min
• Skill: Beginner (just take your time and stay safe)
• Tools & Materials: Multimeter, 1/4-in nut driver (6 mm), new manufacturer-approved thermal fuse
• Cost: Parts $3–$10
• Safety: Unplug the oven or switch off its circuit breaker before starting
- Turn off the power at the breaker and use a multimeter to be sure there’s no voltage.
- Remove the broiler pan and racks inside your oven.
- Carefully pull the oven away from the wall. If needed, disconnect the power cable.
- Open the back panel to reveal the thermal fuse.
- Loosen and remove the fuse using a 1/4-in nut driver (6 mm).
- Note how the old fuse sits and how the wires are connected.
- Install the new fuse in the same position and orientation.
- Put the back panel, racks, and broiler pan back in place, restore power, and run a heat test to check your work.
After you reassemble everything, run a test cycle to make sure the oven heats properly. Check that the temperature settings are right and no error signals show up. If the oven still doesn’t heat correctly, double-check your connections and how the fuse is oriented. Follow these steps carefully, and soon you’ll have a safely working oven.
Essential Tools and Parts for Oven Thermal Fuse Replacement

Before you begin, gather all the proper tools and parts to replace your oven's thermal fuse safely. Using the right parts helps you fix the fuse so it can handle high heat and keeps your repair in line with the manufacturer’s standards. A digital multimeter (a tool to test if electricity flows) is essential to check if the fuse has really blown before you replace it.
You will need:
- 1/4-in nut driver with a magnetic tip
- Digital multimeter set to continuity mode
- Thermal fuse approved by the manufacturer that matches your oven model
- Insulated gloves and safety glasses
- Flashlight or headlamp
- Replacement panel screws (in case the originals get stripped)
- Owner’s manual or wiring diagram
Before you start, check that your tools are working well and every new part fits your oven. Reviewing your owner’s manual or wiring diagram can help you avoid mistakes. This extra step saves time and makes the repair process safer.
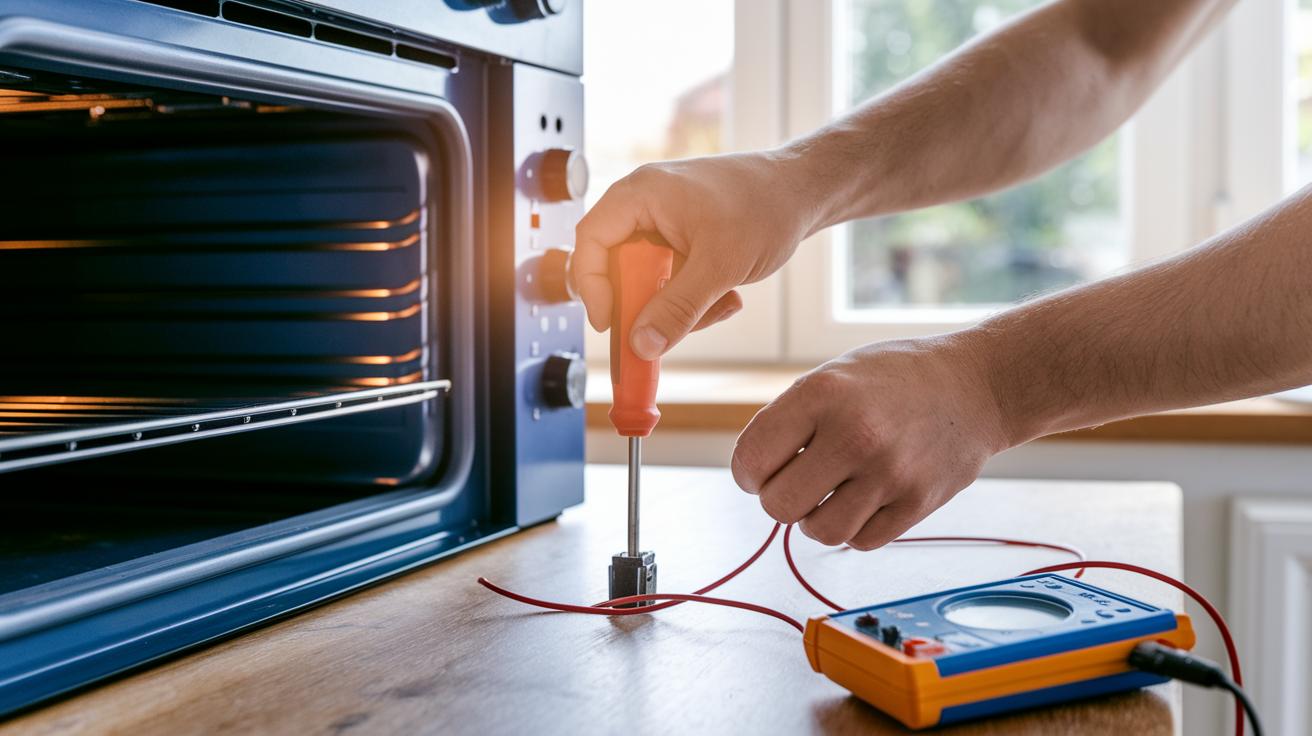
Verifying Oven Thermal Fuse Failure Without Replacement
Quick Fix
What: Test your oven's thermal fuse
Time: 15 min
Skill: Basic electrical work (handle with care)
Tools: Digital multimeter, screwdriver, gloves
Cost: Free if you already have the tools
Safety: Unplug the oven and turn off the circuit breaker before you start
- First, disconnect power. Unplug your oven and switch off the circuit breaker. This keeps you safe from any electrical shock.
- Next, remove the control panel. This gives you clear access to the thermal fuse area for testing.
- Set your digital multimeter to continuity or ohms mode. Touch the test leads to the two fuse terminals. If your meter beeps or shows a low resistance, the fuse is working fine. Tip: Make sure the leads are firmly connected to the terminals.
- Finally, check the reading. No beep or an infinite reading means the fuse is blown. Write down the resistance value and note any odd wiring. This helps decide if further repairs are needed and ensures you only replace parts that are really bad.
Sourcing OEM Fuses and Estimating Replacement Costs

Quick Fix:
• What: Find the right OEM fuse and plan your repair cost.
• Time: 15–20 min
• Skill: Beginner (basic research and safety checks)
• Tools & Materials: Your appliance model info, phone or computer for browsing, and a fuse from brands like Whirlpool, GE, Frigidaire, or Samsung.
• Cost: OEM fuses run about $10–$30; aftermarket ones come in under $10 but may not meet heat safety standards. A technician’s visit might add $50–$100.
• Safety: Check that the fuse matches your appliance’s heat-cutoff needs.
- Look for an OEM fuse made for your appliance. These parts are made to hit specific heat limits. They cost between $10 and $30 at parts stores or trusted online shops.
- You can find cheaper aftermarket fuses for less than $10. But be careful, they might not shut the heat off the way they should, which could affect safety.
- Check both local stores and online shops when shopping. Local spots might have the part on hand and give personal advice. Online stores often offer lower prices and a wider range.
- Remember that buying in person can cost a bit more, but you get to make sure the fuse fits your appliance before you pay.
- When planning your repair, add up the fuse cost and any extra help. If a technician fixes it for you, expect their fee to be between $50 and $100. This brings the total cost to roughly $60–$130.
- If you decide to do it yourself, you’ll save on labor. Just be sure you follow all safety tips and check that the fuse fits correctly.
Safety Precautions for Oven Thermal Fuse Work
- Turn off the power at the circuit breaker and wait for the oven to cool completely.
- Wear insulated gloves and safety glasses to guard against burns from hot surfaces and cuts from sharp metal edges.
- Check the outlet with a multimeter to ensure there is zero voltage before you begin.
- Follow your appliance’s service manual and avoid touching any wiring or live parts.
Common Oven Thermal Fuse Replacement Pitfalls and Pro Tips
Quick Fix
• What: Replace a faulty oven thermal fuse
• Time: 30 min
• Skill: Beginner
• Tools & Materials: Screwdriver, multimeter, pen & paper or phone for photos
• Cost: Parts $5–$15
• Safety: Unplug the oven before you start
-
Mark the Fuse Orientation
Before you remove the fuse, take a quick photo or write down the wiring colors and note the fuse’s exact position. This helps you reinstall it correctly. -
Remove the Fuse Gently
Unscrew the fuse carefully. Don’t use too much force or overtighten the screw, as this can damage the fuse housing and strip the threads. -
Use the Right Part
Make sure you use a replacement fuse that matches the manufacturer’s specifications. Using a non-approved part may risk improper heat cutoff. -
Reinstall and Secure Properly
Match the orientation and wiring you noted earlier. Follow the recommended torque settings when screwing it back in to avoid damage. -
Test the Oven
After reinstalling the new fuse, plug in your oven and let it preheat. Watch to see if it reaches the set temperature smoothly. If it heats slowly or shows error signals, check the wiring and fuse direction again. -
Verify with a Multimeter
If needed, use a multimeter to run a continuity test. Adjust any connections based on your notes to ensure a solid final repair.
By taking these steps, you can avoid common mistakes and get your oven working correctly again.
Visual Guides and Video Walkthroughs for Oven Thermal Fuse Repair
Quick Fix:
• What: Replace a faulty oven thermal fuse.
• Time: 15 min.
• Skill: Beginner (follow the video steps).
• Tools & Materials: 1/4-in nut driver (6 mm), replacement fuse.
• Cost: About $5–$15.
• Safety: Disconnect power before you begin.
Steps:
- Watch the video to see how to remove the oven panel.
- Find the fuse behind the control board.
- Use the 1/4-in nut driver to unscrew the fuse. Check the wiring orientation as you go.
- Follow the video cues to install the new fuse correctly.
- Reassemble the panel as shown.
Our video clips let you see each step up close. They show key moves like removing screws and handling wires with care. You’ll even see a technician unscrewing the fuse while noting which way the wires go.
After the video, review the photos or diagrams placed right beside the clip. These images show close-ups of the fuse’s spot, the wiring connections, and the panel reassembly points. Clear labels and arrows help you double-check that the fuse sits in the right spot for a smooth repair.
Final Words
In the action, we've walked through identifying a faulty fuse, disconnecting power, and carefully swapping in a manufacturer-approved replacement.
We've covered diagnosing the problem, gathering the right tools, and following clear safety steps.
With these step-by-step directions, practical tips, and visual guides, you're set to handle your oven thermal fuse replacement confidently.
Tackle the task with care and enjoy the reward of a warm, reliable oven once again.
FAQ
What is the cost for oven thermal fuse replacement?
The oven thermal fuse replacement cost generally includes parts priced from $10 to $30, plus a service fee of about $50 to $100 if you hire a professional.
How do I perform an electric oven thermal fuse replacement or change the fuse?
The replacement requires turning off power at the breaker, removing the oven’s back panel, unscrewing the fuse with a 1/4-inch nut driver, noting the orientation, and installing a manufacturer-approved fuse.
Where can I find appliance-specific thermal fuse replacements like Whirlpool, Samsung, and Frigidaire?
Replacement fuses for Whirlpool, Samsung, and Frigidaire ovens are available through local appliance parts stores or online. OEM parts are recommended to ensure proper fit and safe heat ratings.
Where is the oven thermal fuse located and can it be reset?
The thermal fuse is usually found behind the back panel, near the control board. It is non-resettable, so a blown fuse must be replaced rather than reset.
How do I know if my oven thermal fuse is blown and what are the symptoms?
A blown fuse stops the oven from heating. A key sign is a complete lack of heat, and using a multimeter to test the fuse usually reveals infinite resistance.
Is it easy to replace a thermal fuse myself?
Replacing the fuse is straightforward if you follow safety steps, disconnect power, and use the correct tools, such as a 1/4-inch nut driver and the proper replacement fuse.