
Quick Fix: Stop Roof Leaks Fast
Time: 15 min
Skill: Beginner
Tools & Materials: Roof leak sealant, putty knife, cleaning cloth, gloves
Cost: Parts $5–$15
Safety: Use gloves and work on a stable, safe surface
- Clean the area. Remove dirt, debris, and any old sealant.
- Apply the sealant. Spread it evenly over the leak with your putty knife.
- Smooth it out. Press down the sealant to form a strong, waterproof barrier.
A little roof leak sealant can stop water in its tracks. Even if you’re new to fixing things, these simple steps help protect your home quickly and safely. Enjoy your leak-free roof!
How to Effectively Apply Roof Leak Sealant for Repair and Prevention
Quick Fix:
• What: Stop a roof leak and keep it sealed for the long term.
• Time: 15 min to apply (plus up to 24 hrs for full cure).
• Skill: Beginner – basic DIY tasks.
• Tools & Materials: Roof leak sealant, caulking gun or container, trowel or spatula, brush, harness, and cut-resistant gloves.
• Cost: Parts around $3–$10.
• Safety: Wear your harness and gloves; clear debris before starting.
-
Clear the area.
Remove loose debris from your roof. Brush off old sealant and scrap off dirt. This step helps the new sealant stick better. -
Check for cracks.
Look for cracks that are less than 1/2 in (1.3 cm) wide. Make sure the surface is dry before you start. -
Load the sealant.
Place the sealant into a caulking gun or pour it out from its container. Get ready to apply a steady bead. -
Apply the sealant.
Squeeze out a even line along cracks or joints. For a small hole, run a smooth line along the base. Steady pressure helps avoid clumps. -
Smooth the bead.
Immediately smooth the sealant with a trowel or spatula. Press out any air pockets. If you have a deeper gap, add the sealant in layers. Let each layer nearly level out before putting on the next. -
Let it cure.
Allow the sealant to go tack-free in 1–4 hours. Then let it fully cure within 24 hours at 50–90 °F (10–32 °C). -
Inspect and touch up.
Once the sealant cures, double-check for any thin or missing spots. Add more sealant if needed for a strong, weather-resistant fix.
Comparing Top Roof Leak Sealant Products and Types

Quick Fix: Pick the right sealant fast
• What: Seal roof leaks with a top-rated roof sealant
• Time: 15–30 min to prep and apply
• Skill: Beginner-friendly
• Tools & Materials: Roof sealant, a clean cloth, and a putty knife
• Cost: $20–$50 per gallon
• Safety: Wear gloves and follow product instructions
Steps:
- Check your roof leak and note the repair area.
- Match the leak type with a sealant kind.
- Apply the sealant as directed.
- Allow it to cure before exposing it to rain.
There are several roof sealant types you can choose from. Liquid rubber systems, such as the popular Gaco waterproof system, form a flexible barrier that pushes water away. Silicone-based sealants bond fast and leave a smooth finish, ideal for sealing joints quickly. Polyurethane glue sealants dry into a tough layer that flexes with roof movements. Asphalt-based compounds are a classic fix for shingle repairs, sticking firmly and withstanding the weather. Roll-on compounds spread evenly over big areas, making them great for large surfaces.
Cure times can vary from about 1 hour until tack-free, with a full cure in 24 hours at temperatures between 50°F (10°C) and 90°F (32°C). Many UV-stable sealants handle temperatures from –25°F (-32°C) up to 180°F (82°C), giving you long-lasting roof protection. Prices usually range from $20 to $50 per gallon, so you can pick one that fits your budget.
| Product Name | Sealant Type | Cure Time | Best Use | Price Range |
|---|---|---|---|---|
| GacoLiquid | Liquid Rubber Barrier | 1 hr tack-free / 4-6 hrs total | Waterproof roof repair | $20-$30 |
| SiliconBond | Silicone Bonding Agent | 2 hrs tack-free / 12 hrs full cure | Quick bonding on roofs | $25-$40 |
| PolyGuard | Polyurethane Glue Seal | 1-3 hrs tack-free / 24 hrs full cure | Fast repairs needing durability | $30-$50 |
| AsphaltPro | Asphalt-Based Compound | 1 hr tack-free / 18 hrs full cure | Shingle adhesion and repair | $20-$35 |
| RollSeal | Roll-on Sealing Compound | 1 hr tack-free / 24 hrs full cure | Even coverage on large surfaces | $25-$45 |
Match your repair needs with the right product. If your roof gets a lot of sun, choose a UV-stable product that works in temperatures ranging from –25°F to 180°F. For a quick fix on small cracks, a silicone-based sealant is fast and easy. If you are covering a large or uneven area, a roll-on sealant spreads evenly without clumping. Compare cure times, flexibility, weather resistance, and price to pick the best sealant. Follow product instructions carefully, and you will have a quick, lasting repair for your roof.
Selecting the Right Sealant for Your Roofing Material
Quick Fix:
- Asphalt roofs: Use an asphalt-based patch that matches your shingle color. Test a small area first.
- Metal roofs: Choose a sealant made for metal. Look for anti-rust and flexible properties.
- Flat roofs: Pick an elastomeric or liquid-rubber membrane. A clear topcoat can add extra water resistance and reduce heat.
- RV/mobile home roofs: Use a flexible, UV-resistant adhesive. Follow the instructions for proper curing.
For asphalt shingle roofs, pick an asphalt-based sealant that blends well with your shingles. This type protects against water and matches the look of your roof. Just dab a small bit in an unseen spot to make sure the color is right.
For metal roofs, use a sealant made to stick to metal. It should guard against rust and stay flexible as temperatures change. This keeps your metal safe and reduces the need for extra fixes.
On flat roofs, go with an elastomeric or liquid-rubber membrane. These sealants stretch a bit to handle small shifts and temperature changes. They also lay down smooth and help shake off water. Adding a clear protective coat can bounce off the sun’s heat better.
For RV and mobile-home roofs, pick a flexible adhesive that stands up to strong UV rays. These formulas work well with the regular movement of your roof and tough sunlight. Always read the product guide and let the sealant cure fully for a strong, lasting fix.
Best Practices for Preparing Your Roof Before Applying Sealant
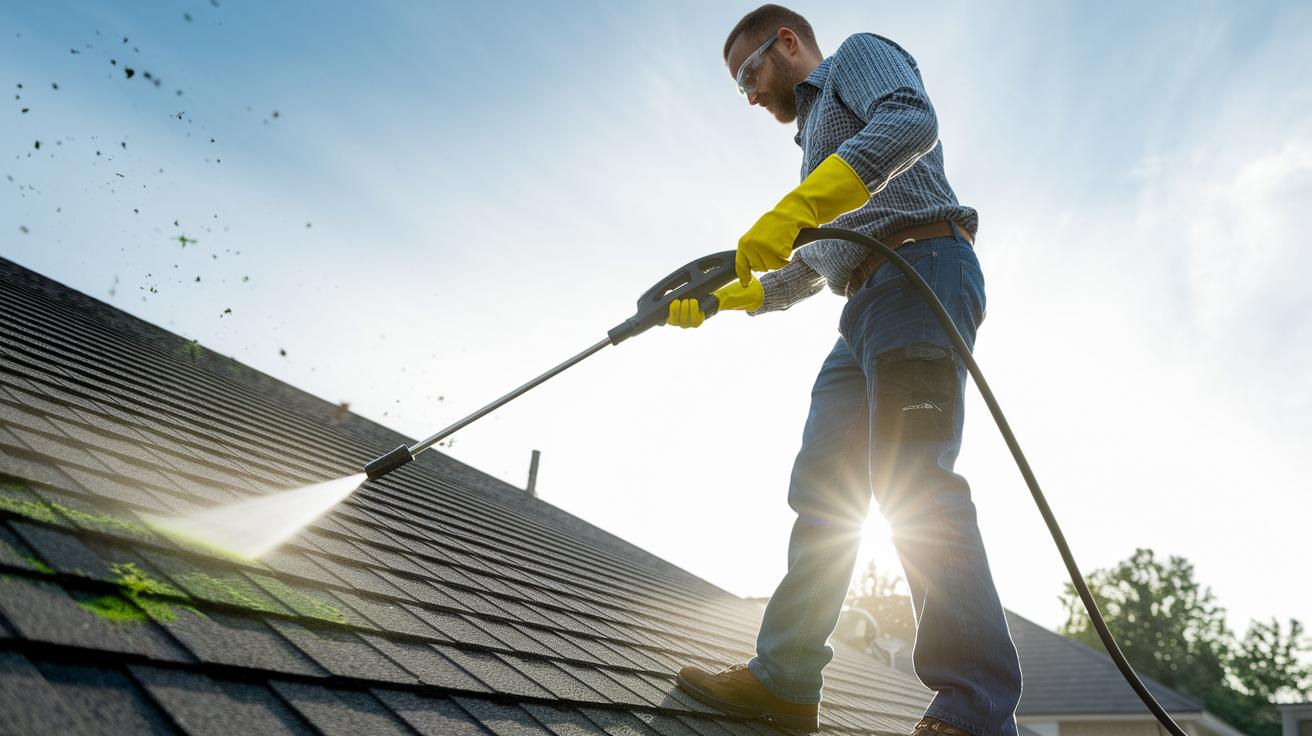
Quick Fix:
• What: Get your roof clean and ready for sealant
• Time: 60 min
• Skill: Intermediate
• Tools & Materials: Pressure washer (2,000–3,000 PSI), wire brush, degreaser or phosphoric acid, rust inhibitor primer, stainless steel fasteners, manufacturer-approved primer, fall arrest system, guard rails, roof brackets, cut-resistant gloves, safety glasses
• Cost: $10–$50
• Safety: Use fall protection gear and wear safety glasses
-
Clean the Roof
Use your pressure washer (set at 2,000–3,000 PSI) to blast off moss, algae, and any old sealant. Then, scrub tough spots with a wire brush and wipe up the loose debris. -
Prep Metal Areas
On metal parts, spray a degreaser or phosphoric acid solution. Rinse well to leave a smooth, clean surface ready for the sealant. -
Inspect Flashings and Joints
Check all flashings carefully. If you see rust or loose sections, apply a rust inhibitor primer and secure any loose pieces using stainless steel fasteners. -
Prime Porous Surfaces
For non-metal areas, apply the manufacturer-recommended primer with a roller or sprayer. Let it flash for 30 min in temperatures between 50–90 °F (10–32 °C) to set a good base. -
Set Up Safety Gear
Before climbing up, set up a fall arrest system rated to 5,000 lbf, install guard rails on slopes over 15° (15 degrees), and arrange roof brackets and planks for stable footing. Always wear cut-resistant gloves and safety glasses while working.
Now you're set to apply your sealant safely and confidently!
roof leak sealant Brings Quick, Lasting Repair
Quick Fix:
• What: Stop roof leaks fast
• Time: 10–15 min for a check and a few extra minutes for cleaning
• Skill: Beginner
• Tools & Materials: Gloves, ladder, repair log, sealant (around $3–$10)
• Safety: Use a secure ladder and work with a friend if possible
- Check your sealant beads every year. Press gently with a gloved finger to feel for cracks or softness.
- Write down your findings in a repair log with the date and weather. This helps you spot any trends over time.
- After a big storm, be sure to inspect the roof flashings and joints for any new damage.
- Every few months, clear away leaves, dirt, and debris from your roof. A clean surface helps the sealant stick better.
- Reapply new sealant every 3–5 years. Look at your repair log and the condition of the old sealant to decide the right time.
- Filling in small gaps early stops them from growing into bigger leaks later on.
Regular checks, cleaning, and timely reapplication keep your roof strong and leak-free.
Troubleshooting Common Roof Leak Sealant Issues

Quick Fix:
- What: Fix roof leak sealant issues.
- Time: 20–30 min.
- Skill: Beginner.
- Tools & Materials: Utility knife, clean cloth, compatible primer, roof sealant.
- Cost: Parts $10–$30.
- Safety: Use a sturdy ladder and wear gloves.
- Use a utility knife to cut out the bad sealant. Look for bubbles, peeling, or sagging areas.
- Let the area dry completely. A wet surface can cause bubbles and poor adhesion.
- Apply a compatible primer to prepare a clean, tacky surface.
- Reapply the sealant using even, steady pressure to form a neat bead.
- Choose sealant that is UV-resistant, chemical-proof, and has the right thickness (viscosity) for your roof's slope to avoid future issues.
Sealant can fail when moisture is trapped under forming skin, when the surface is damp, or when a stiff construction adhesive is used instead of a flexible sealant. Following these steps will help you create a durable, weatherproof patch.
Final Words
In the action, you prepped your roof with safety gear, removed debris, and applied a steady bead of roof leak sealant to cover cracks properly. You smoothed the sealant, layered it for deeper gaps, and let it cure at the right temperature. You also compared sealant types for different roof materials and learned how to check and maintain your work. With these quick, practical steps, you’re well on your way to keeping your roof dry and secure. Enjoy the results.
FAQ
Best roof sealant for leaks
The best roof sealant for leaks uses a flexible formula that bonds well to surfaces and cures to block water from seeping through. It offers strong adhesion and UV resistance.
Waterproof Roof Sealer
A waterproof roof sealer creates a liquid barrier that stops water and withstands weather. It helps protect your roof by sealing gaps to keep moisture out.
Roof leak sealant home depot
Roof leak sealants found at Home Depot include silicone and polyurethane options. They are designed for quick repairs and durable performance on a variety of roof types.
Best roof sealant for asphalt shingles
The best roof sealant for asphalt shingles has a strong bond and matches the shingle texture. It prevents water penetration and offers UV protection for long-lasting repairs.
Roof Sealer for shingles
A roof sealer for shingles adheres well to asphalt surfaces, creating a weather-resistant layer that helps block water and prevent leaks on your roof.
Best roof sealant for flat roofs
The best roof sealant for flat roofs is usually elastomeric or liquid rubber. It forms a continuous, flexible barrier that prevents ponding water and stops leaks.
Roof Sealant home depot
Roof sealants sold at Home Depot are tailored for various roof types, offering easy application and effective sealing. They work well for both small fixes and larger repairs.
Roll on roof Sealant
Roll-on roof sealant is applied with a roller that provides even coverage and a smooth finish. It is ideal for maintaining flat surfaces and small repair jobs.
What is the best sealant for a leaking roof?
The best sealant for a leaking roof matches your roof material and delivers a durable, flexible seal over cracks and joints, effectively stopping leaks from recurring.
Can I spray Roof Maxx myself?
Spraying Roof Maxx yourself is feasible if you follow the product instructions, wear proper safety gear, and use the recommended applicator for a consistent coating.
Will sealing a roof fix a leak?
Sealing a roof can fix a leak if all cracks and joints are properly covered. In cases of extensive damage, additional repairs or a professional opinion might be needed.
What is the best solution for a leaking roof?
The best solution for a leaking roof involves cleaning the area, applying a compatible sealant, and ensuring full curing, which together stop water from entering.
Which Henry roof sealant products are available?
Henry roof sealant products include Tropi-Cool 885, Crystal Clear Sealant, and Tropic-Cool White Silicone Sealant. They are popular for their strong adhesion, fast curing, and reliable leak protection.